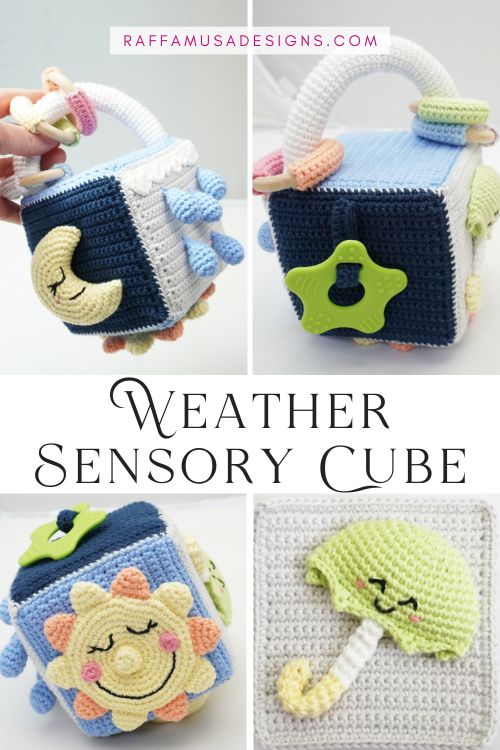
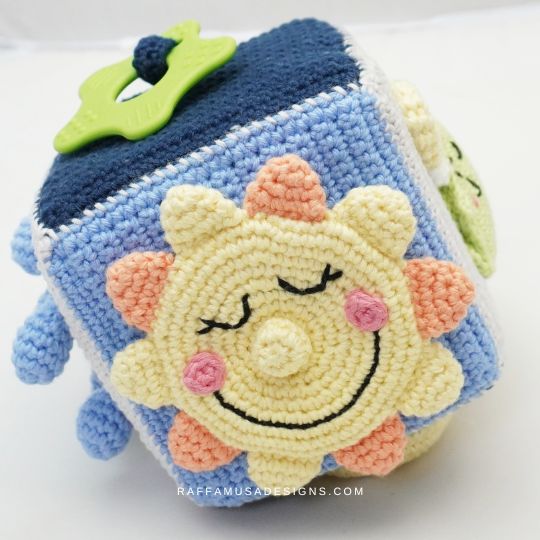
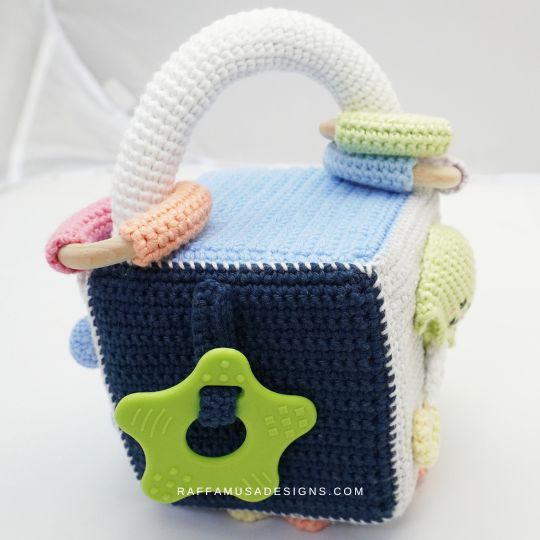
Crochet this fun weather baby cube for your baby or as a gift for the next baby shower you’re invited to!
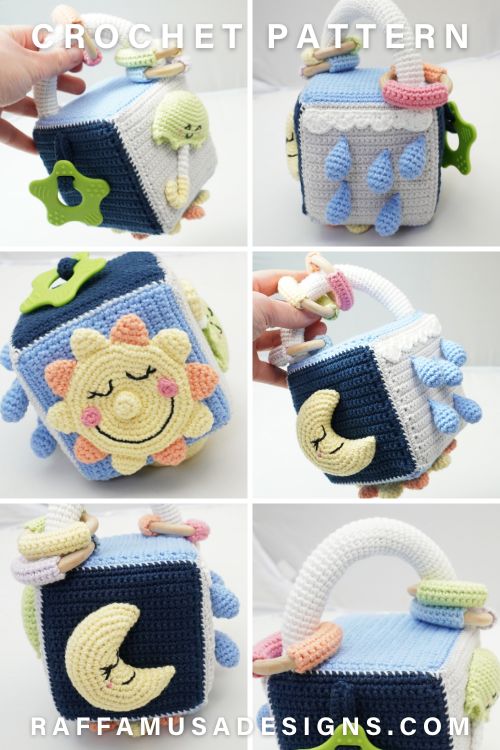
Sensory cubes are a great way to stimulate a baby’s senses and curiosity. You can make them in many different ways, but the general idea is that each face of the cube should have something special, colorful, or with a special texture that attracts babies’ attention.
For my cube, I picked the weather as a theme, so each face of the cube has something inspired by it.
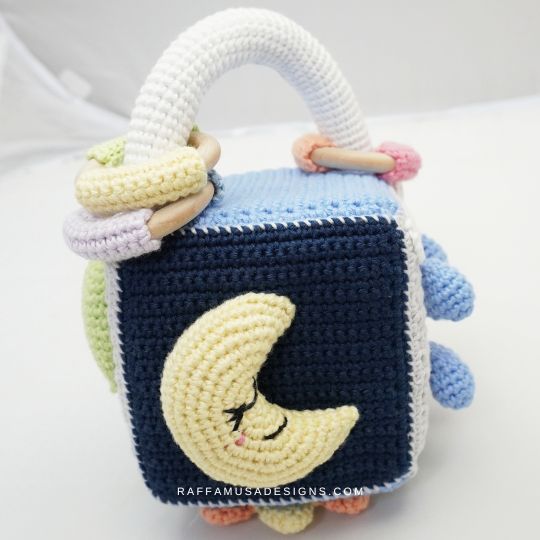
The first face features a white cloud-mimicking handle with rainbow-colored rings around it. On the opposite side of the cube, there is a smiling sun that turns around its nose.
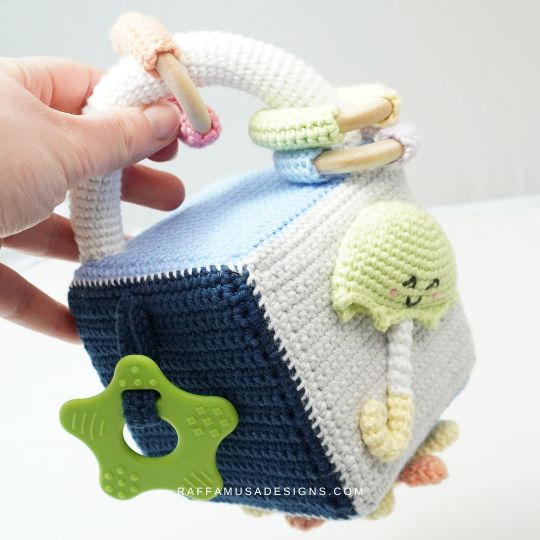
Then, we have a face full of raindrops and one with a squeaking umbrella. Finally, the last two faces of the cube are a moon and a teething star.
Of course, you can use my pattern for inspiration and personalize your cube with your favorite weather elements.
Find more Amigurumi patterns here on the blog…
Add this pattern to your Ravelry queue HERE and favorite it (– thank you!). Or save it for later by pinning it to your favorite crochet board on Pinterest using this pin!
Note: this post contains affiliate links. If you purchase something through the links on my blog, I might earn a commission. This will not have any effect on the price you pay. For more info, please, see my Privacy Policy.
Printable PDF Pattern
The printable pattern of the Weather Baby Cube is available in all my online shops. Get your copy on Ravelry HERE, Lovecrafts HERE, or Etsy HERE.


MATERIALS
- DK (3, Light) Yarn
- 3.0 mm (11 UK) Crochet Hook
- Tapestry Needle
- Cotton Stuffing for Amigurumi
- Black Embroidery Floss
- 3 Teething Rings, 2″ (5 cm) external diameter, 1.8″ (4.5 cm) internal diameter
- 4″ (10 cm) Memory Foam Cube (I used this one HERE)
- 1 Soft TPE Star, 2.4″ (6 cm) (like this one HERE)
YARN & YARDAGE
I used Hobbii Rainbow Cotton 8/6 (50 g, 115 yds / 105 m) in the following colors:
- White – Natural White (002)
- Pink – Light Coral (050)
- Purple – Pastel Purple (041)
- Light Blue – Light Sky Blue (071)
- Dark Blue – Navy Blue (030)
- Green – Dusty Light Green (075)
- Yellow – Pastel Yellow (053)
- Orange – Peach (049)
- Grey – Pearl Gray (073)
SIZE
4″ (10 cm) measured without the handle and the decorations around the cube.
GAUGE
13 sc for 14 rows in 2″ (5 cm)
ABBREVIATIONS (US TERMS)
- BLO – Back Loop Only
- Ch – Chain
- Dc – Double Crochet
- FLO – Front Loop Only
- Hdc – Half Double Crochet
- Inc – Increase
- Inv Dec – Invisible Decrease
- MC – Magic Circle
- Mini Picot – Mini Picot
- RS – Right Side
- Sc – Single Crochet
- Sl St – Slip Stitch
- St – Stitch
- Tr – Treble Crochet
- Yo – Yarn Over
Special Stitches
Back Loop Only (BLO) or Front Loop Only (FLO) Tutorial HERE.
Increase (Inc)
One increase consists of 2 sts worked in the same indicated st.
Invisible Decrease (Inv Dec) Tutorial on HERE.
Magic Circle (MC) See the tutorial HERE.
Mini Picot Stitch (Mini Picot)
Ch 2, sl st in first-made ch.
PATTERN NOTES
- If the pattern says “sc 2”, you have to crochet 1 sc in each of the next 2 sts.
- (…) – Repeat instructions within parentheses for the indicated number of times.
- […] – Crochet the instructions within square brackets all in the same indicated st.
- *… – Repeat the instructions from * for the indicated number of times.
Crochet Weather Sensory Cube for Babies
Cube Faces
Crochet 6 in the following colors:
- 2 with light blue;
- 2 with grey;
- 2 with dark blue.
Ch 25.
Row 1. Sc in each ch across starting from the second ch from hook. (24 sts)
Row 2. Ch 1 (does not count as a st), turn. Sc 24. (24 sts)
Rows 3-25. Repeat row 2.
Without turning, ch 1 (does not count as a st) and move on to the border.
Border
Round 1. Sc all around placing 24 sts on each side of the square. Ch 1 at each corner. At the end of the round, ch 1 and sl st in first sc to join. (24 sts per side, 1 ch at each corner)
Fasten off and weave in your ends.
Side 1 – Rainbow
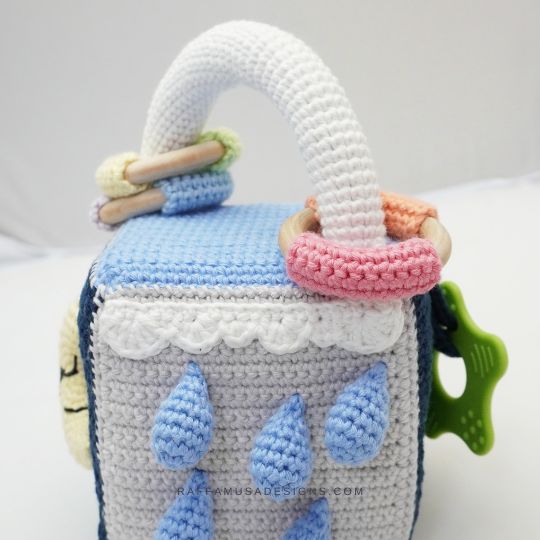
Handle
Crochet in the round in a continuous spiral.
With white, make a slip knot leaving a long tail (you will need it later for sewing the handle), and ch 14. Sl st in first-made ch to form a ring. Pay attention not to twist your ch.
Round 1. Sc all around. (14 sts)
Repeat round 1 until your piece measures about 6.3″ (16 cm).
Fill with stuffing as you go.
Fasten off leaving a long tail for sewing.
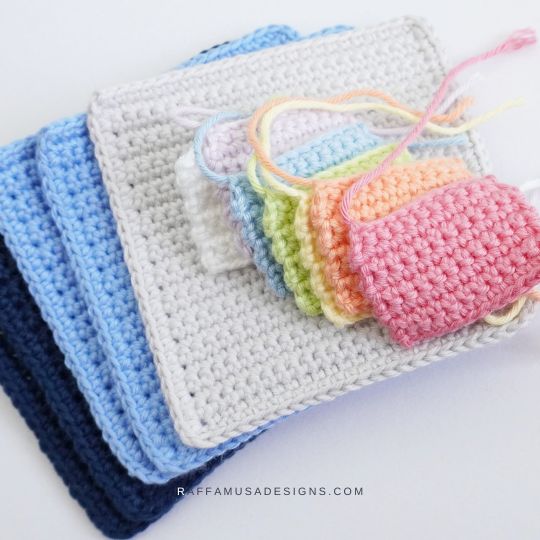
Rainbow Teething Rings
Crochet 6, one in each of the following colors: light blue, purple, green, yellow, orange, and pink.
Ch 12.
Row 1. Sc in each ch across starting from the second ch from hook. (11 sts)
Row 2. Ch 1 (does not count as a st), turn. Sc 11. (11 sts)
Rows 3-8. Repeat row 2.
Fasten off leaving a long tail for sewing.
Assembly
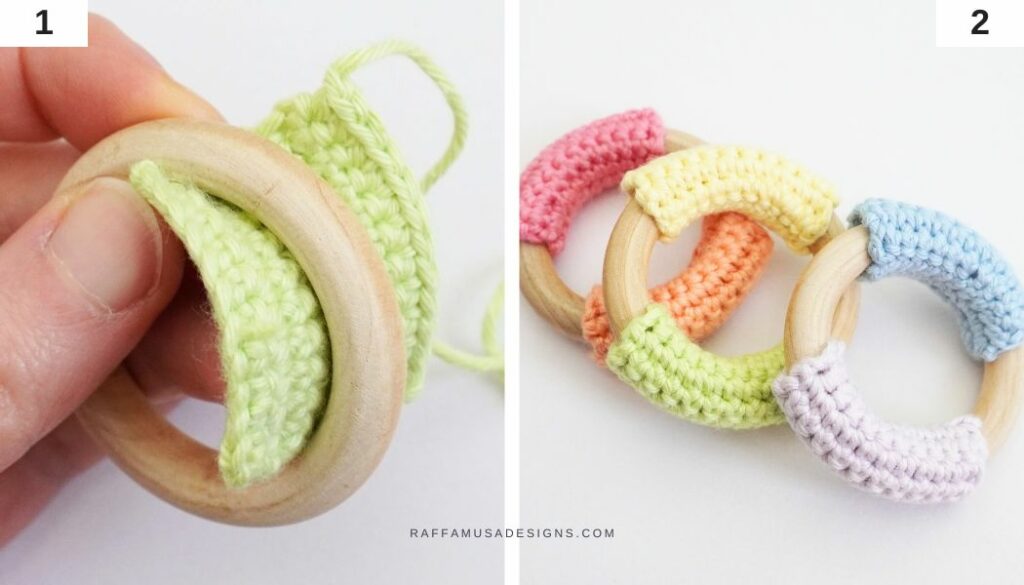
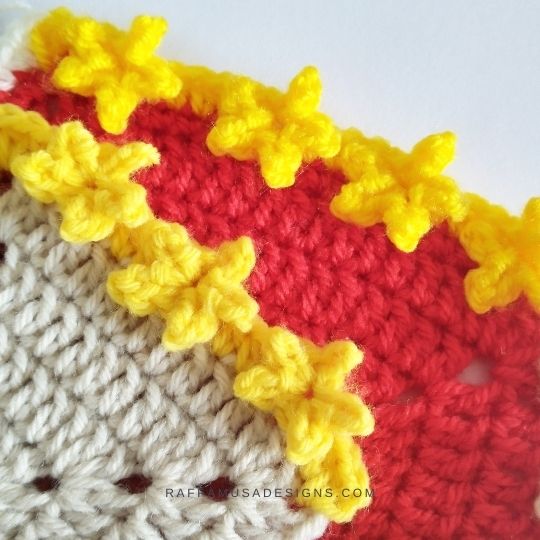
Using the whip stitch (page 14), sew two colored rectangles around each teething ring (photos 1-2)
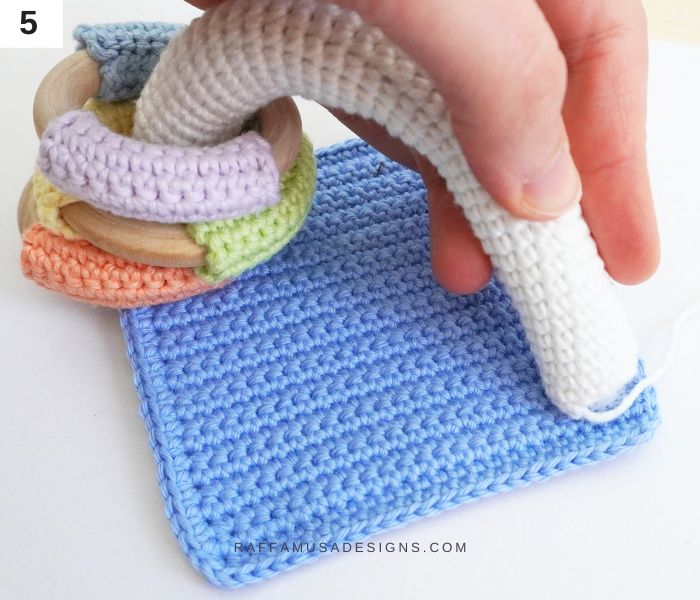
Sew one end of the handle at one corner of one of the light-blue cube faces (photo 3).
Thread the rainbow teething rings through the free end of the handle (photo 4).
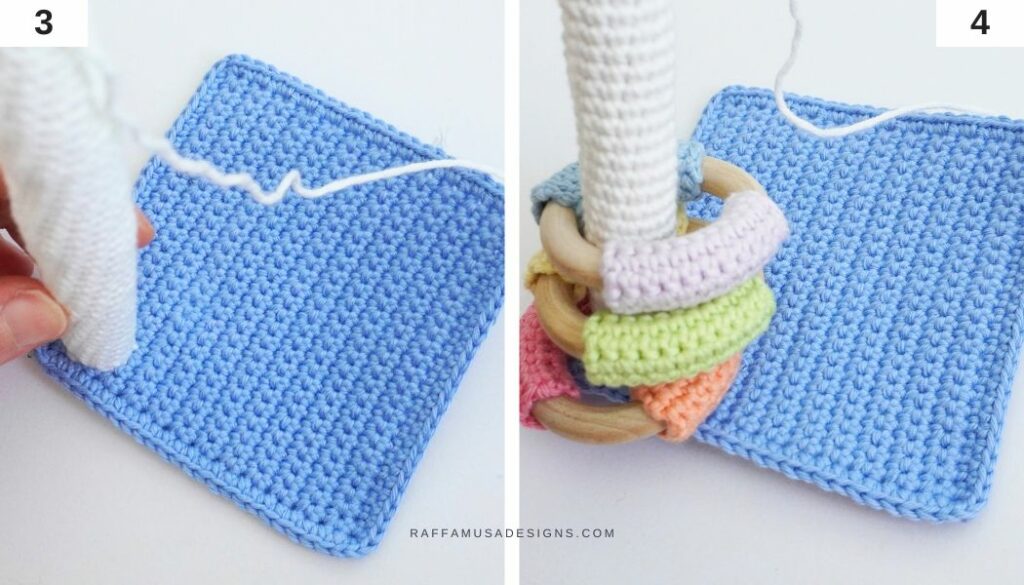
Bend the handle and sew the other end at the opposite corner compared to where you attached the first end (photo 5).
Fasten off and weave in your ends.
Side 2 – Sun
Crochet one sun sensory toy as shown HERE.
Side 3 – Rain
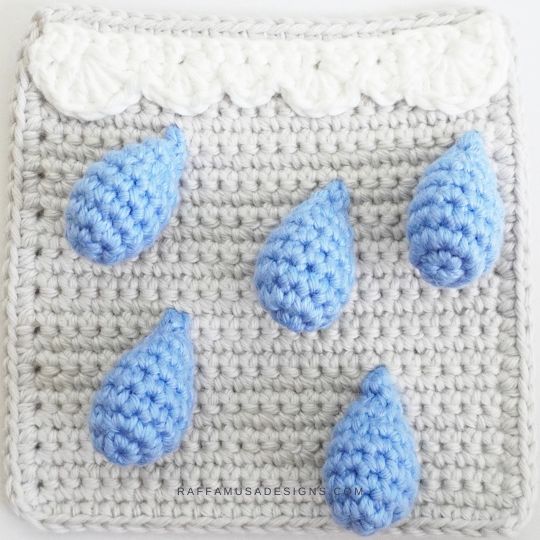
Cloud
With white, ch 25.
Row 1. Sc across starting from the second ch from hook. (24 sts)
Row 2. Ch 1 (does not count as a st), turn. Sk 2, [dc 6] in next st, sk 2, sl st 1, sk 1, [hdc 5] in next st, sk 1, sl st 1, [sc 1, hdc 1, sc 1] in next st, sl st 2, sk 1, [hdc 5] in next st, sk 1, sl st 1, [sc 1, hdc 1, sc 1] in next st, sl st 1, sk 2, [dc 6] in next st, sk 1, sl st 1.
Fasten off leaving a long tail for sewing, and join the round with an invisible join.
Raindrops
Crochet in the round in a continuous spiral.
With light blue, make 5 small raindrops as described HERE.
Assembly
Sew the cloud on one grey square aligning row 1 of the cloud with the the initial chain of the square (and not with the border!).
Sew the tip of the raindrops on the square making sure to secure them very firmly.
Weave in all your ends.
Side 4 – Umbrella
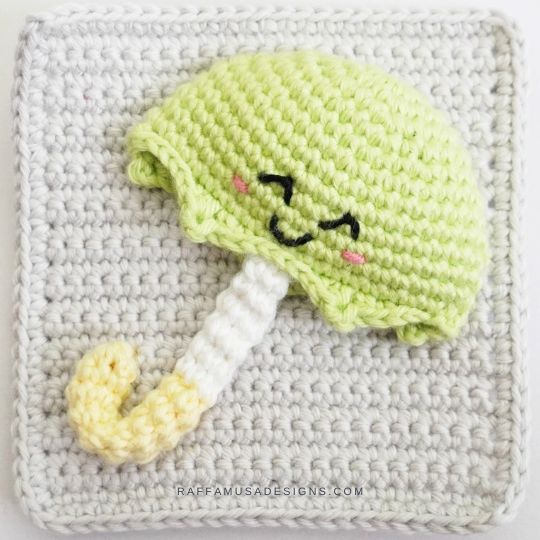
Crochet an umbrella Amigurumi as described HERE.
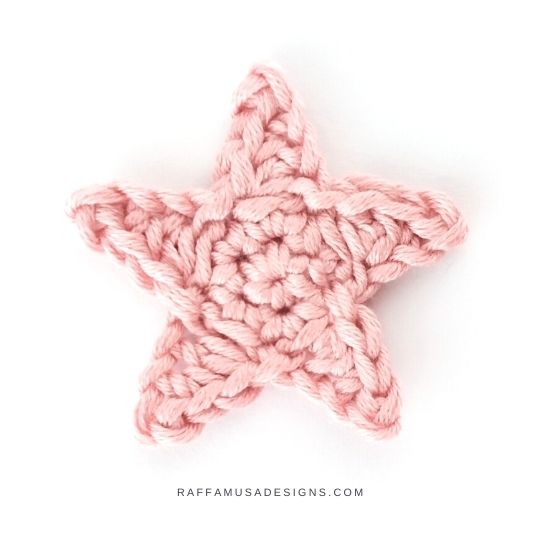
Side 5 – Star
Star Holder
With dark blue, ch 26.
Row 1. Sc across starting from the second ch from hook. (25 sts)
Row 2. Ch 1 (does not count as a st), turn. Sc across. (25 sts)
Fasten off leaving a long tail for sewing.
Assembly
Pass the star holder through the holder hole, fold the holder in two, and sew both ends of the star holder to the top of one dark blue cube face. Weave in all your ends.
Don’t have a teething star? Crochet these star patterns:
Side 6 – Moon
Find the pattern for the moon Amigurumi HERE.
Assembly
Sew the moon on one of the dark blue squares.
Sensory Cube Assembly
Once all your cube faces are ready, place them as shown in the picture below (photo 6).
Pay attention to the orientation of each square!
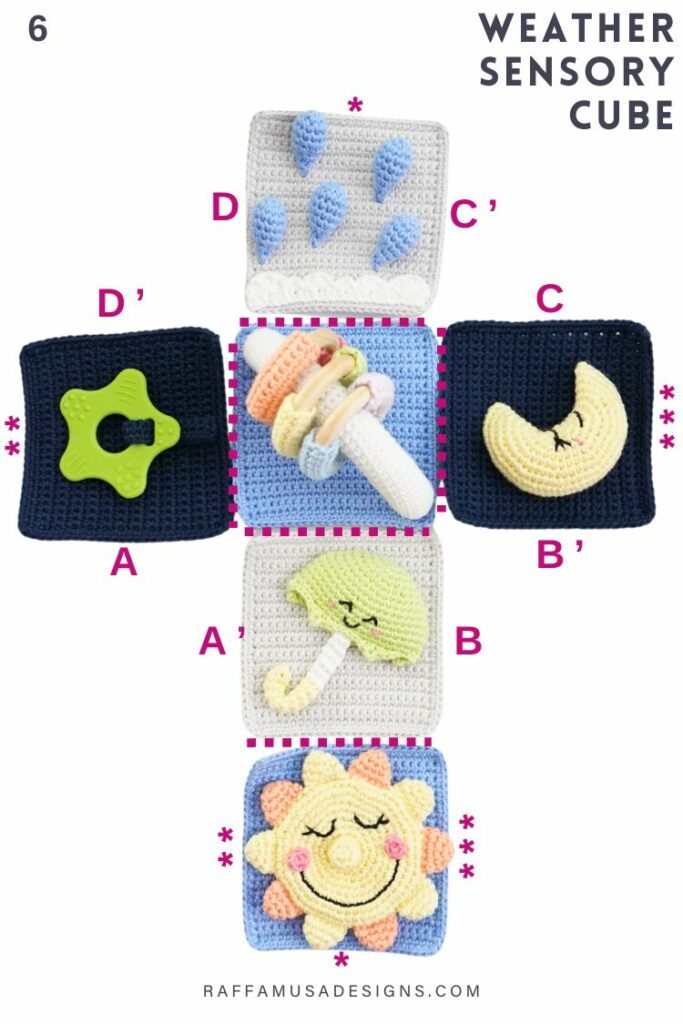
Using the whip stitch, sew the squares together starting with the sides highlighted by the dashed line in photo 6.
Then, sew the sides indicated with corresponding letters (A and A’ to D and D’).
Place the memory foam cube inside and sew the final face (the one with the sun) to the free sides indicated with asterisks in photo 6.
Fasten off and weave in all your ends.
YOUR CROCHET Weather Baby Cube IS READY!
I hope you enjoyed this free crochet pattern, and I’d love to see your sensory cubes! Please, share a pic of your work on Facebook and Instagram using the hashtag #raffamusadesigns!
Find more free Amigurumi patterns here on the blog…
Where does one find the sun pattern?
Hi, I’m still finishing the blog post. I guess I’ll have it ready by today and I’ll add the link in this blog post 🙂