The Magic Circle or magic ring or adjustable ring is one of the most useful crochet techniques to learn when you need to work in the round.
Although difficult to grasp at first, it will make your crochet life much easier once you master it!
What is the Magic or Adjustable Ring?
The magic circle is a technique to start crocheting in the round without making a slip knot. And here comes the magic! Because with the magic ring you crochet your stitches inside an adjustable loop that you can pull tight or release as you like.
Why should you Learn to Crochet a Magic Circle?
The magic circle is useful for all those projects that are crocheted in the round.
- Top-down hats and beanies, like for example the Star Stitch Beanie or the Basket Weave Baby Beanie
- Amigurumi
- Granny Squares
Compared to crocheting the first round into the first made chain, the awesome thing about the magic circle is that you can tighten it completely. In other words, you won’t have any gaps and holes in your final project!
Is the Magic Ring Safe?
Since the magic ring is adjustable, it can go either in the direction of tight or in the direction of loose.
Does this mean that it can open up again once you have completed your project?
Well, yes and no. The thing is that you really need to know how to tighten it and secure the loose end. Keep scrolling below to find more about how to weave in your ends and secure the magic ring!
How to Crochet the Magic Circle – Tutorial
Here, I prepared a photo tutorial for you and full step-by-step written instructions on how to crochet the magic circle (MC).
For this tutorial, I used an 8 mm (L/11 US, 0 UK) crochet hook and some T-shirt yarn in a bright mint color that I was using to crochet my Summer Mint Trivet.
So, just grab some yarn and hook, and practice the MC!
Pin the free tutorial on how to crochet the Magic Circle to your favorite Pinterest board using this Pin!
Materials
– Yarn of choice
– Crochet hook of the appropriate size
Magic Circle – Tutorial
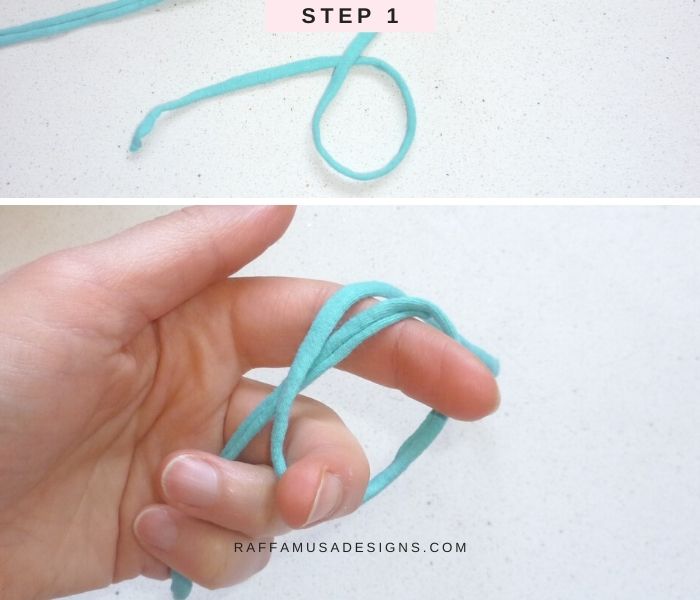
Step 1
With your left hand (assuming you are right-handed), hold the loose end of the yarn with your pinky and ring finger. Make the yarn pass in between your thumb and index finger, and then make a loop around your index and middle finger. Bring the yarn toward the outside, like shown in the picture below.
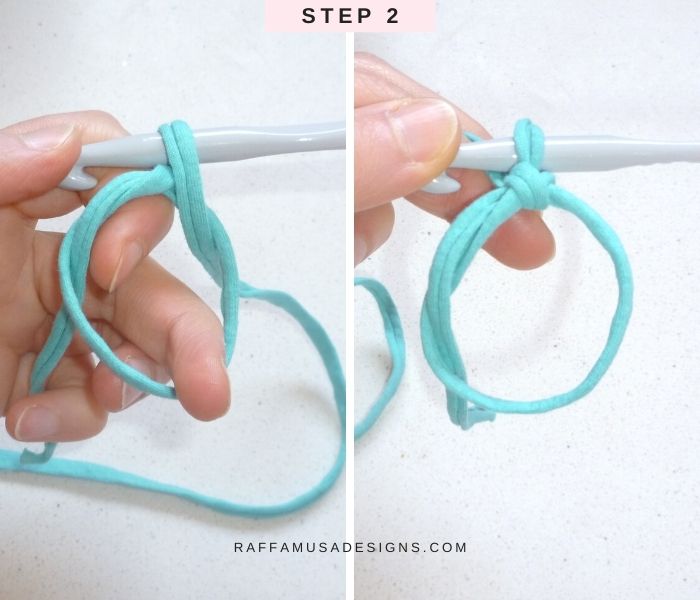
Step 2
Insert your crochet hook in the loop, just above your index finger. Reach the yarn you positioned toward the outside and pull up a loop. This loop will be pretty loose and unstable. So, secure it by chaining 1.
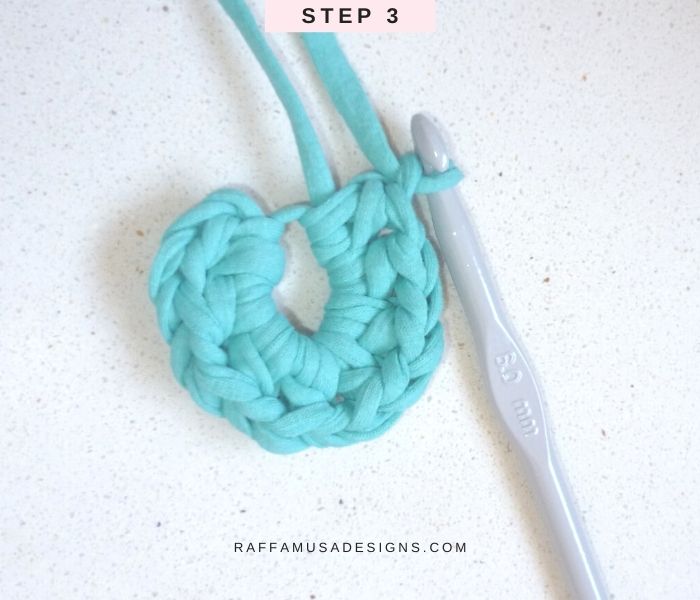
Step 3
Crochet a number of stitched into the MC as indicated in the pattern.
For practicing, make one more chain, so now you have 2 chains in total, and crochet 8 double crochet stitches into the MC.
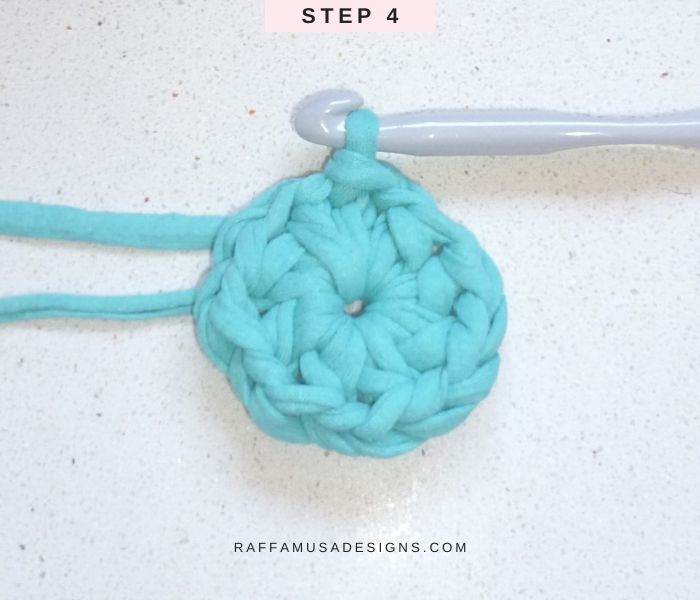
Step 4
Close the MC by pulling the loose end. When you do this, your stitches will come close together and you can slip stitch into the top of the very first stitch you made.
Securing the Magic Circle or Ring
Make sure to secure the MC very well in order to avoid it opening up again
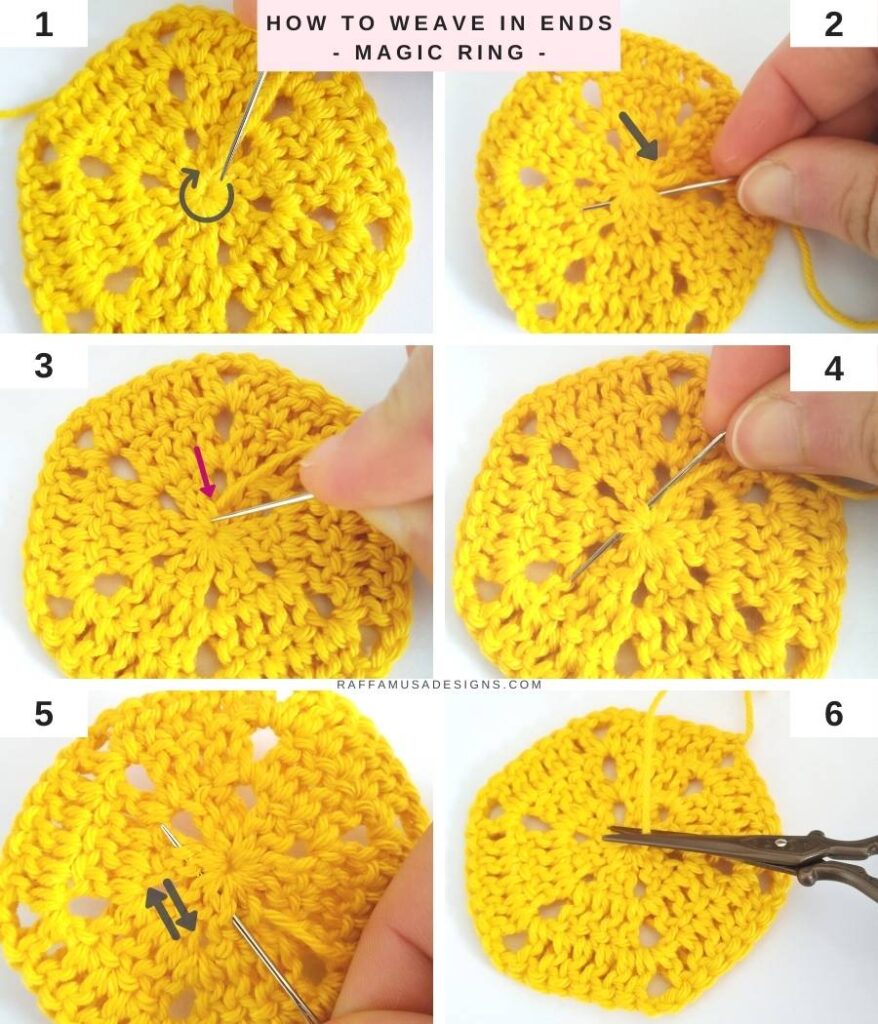
- Step 1. After closing the ring, thread the loose end of yarn through the base of the first round of stitches in the same direction as the magic circle itself. Repeat this a couple of times (Pictures 1-2).
- Step 2. Thread the yarn once in the opposite direction, still through the stitches of the first round (Pictures 3-4). Obviously, when reinserting your needle through the stitches, you will need to leave at one loop out (see the pink arrow in Picture 3). If you do not do this, you will just undo what you did in step 1!
- Step 3. Weave your yarn a couple of times through a few stitches on round 2 of your work (Picture 4).
- Step 4. Finally, bring your yarn back to the center of the ring, pass it through the stitches of the first round a couple more times, and cut the extra length of yarn.
And there you are…
You just made an safe and secure adjustable ring!
I hope you enjoyed learning how to crochet a magic circle or ring. Please, do not hesitate to contact me if you need any help or support. I am looking forward to seeing all your beautiful makes on Facebook and Instagram!
Find here some other free tutorials that might help you improve your crochet techniques.
WHY CAN’T YOU USE A CHAIN 4, SL TO CLOSE THE CIRCLE AND DO THE SELECTED AMOUNT OF DCs OR SCs SINCE YOU SHOW HOW TO JUST TRIM ALL THE ENDS. WHY DO YOU NEED A “MOVEABLE” SIZE CIRCLE?
Hi,
You can definitely use a ch-4 closed in a circle or ch a number of chains and crochet the first round in first-made ch.
The adjustable ring is just an alternative option. I like it because you can close it very tightly so that the center of the work does not have any holes.
But of course, everyone chooses the method they prefer 🙂
Best,
Raffaella