What would you do if you just learned that you were soon going to become an aunt/uncle? Well, of course, crochet a set of Amigurumi Raindrops in all sorts of sizes!
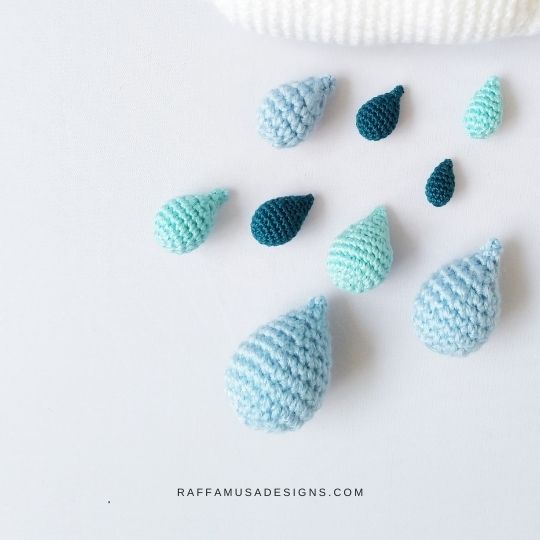
It makes sense, doesn’t it? If you don’t see the connection, I hope that will become clear in the next few lines.
I bet you’ve seen that kind of nursery, wall-hanging décor with a crochet cloud and raindrops hanging on the bottom. I think those look super cute! So, even though I much prefer the sun, I thought it would be nice to crochet something similar for my niece (yes, it’s a girl!).
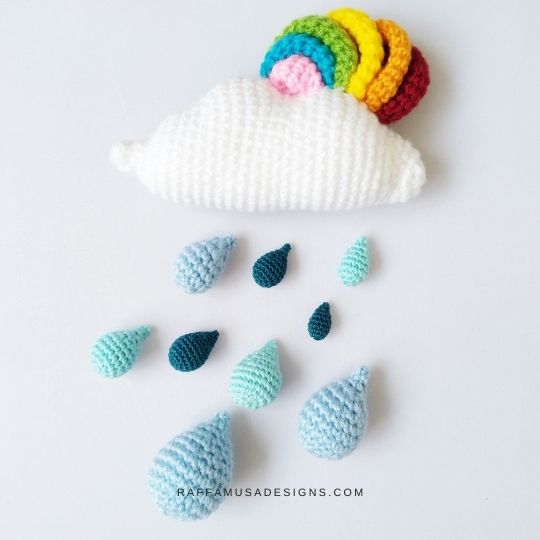

A while ago, Samanta from Follow the Crochet was giving away her rainbow pattern on her Instagram account. So, I made a cute, little cloud.
My cloud is much smaller than Samanta’s because I used DK yarn and a 4-mm crochet hook.
Anyhow, I thought I could try and add some raindrops to that cloud. So I could get a general idea of what I should change for the final project. Should I make a bigger cloud maybe?
Well, the answer is definitely yes! I surely need to make everything bigger (maybe using some thicker yarn?).
In the meantime, I hope you’ll enjoy these patterns I wrote for making Amigurumi raindrops in three different sizes.
Find more free Amigurumi patterns here on the blog…



Add the free pattern of the Amigurumi Raindrops to your Ravelry queue HERE and favorite the pattern (thank you!). Or pin it for later using this Pin!
Ad-Free Downloadable PDF
If you’re annoyed at ads and would like to support my small business, I’ve got the solution! You can purchase the ad-free version of this pattern for a very inexpensive price both on my Ravelry, LoveCrafts, and Etsy stores!
Materials
- Your Favorite Yarn
- The Appropriate Crochet Hook Size
- One Stitch Marker (to work in the round)
- A little amount of Fiberfill or other Stuffing Material
- Tapestry Needle
Size
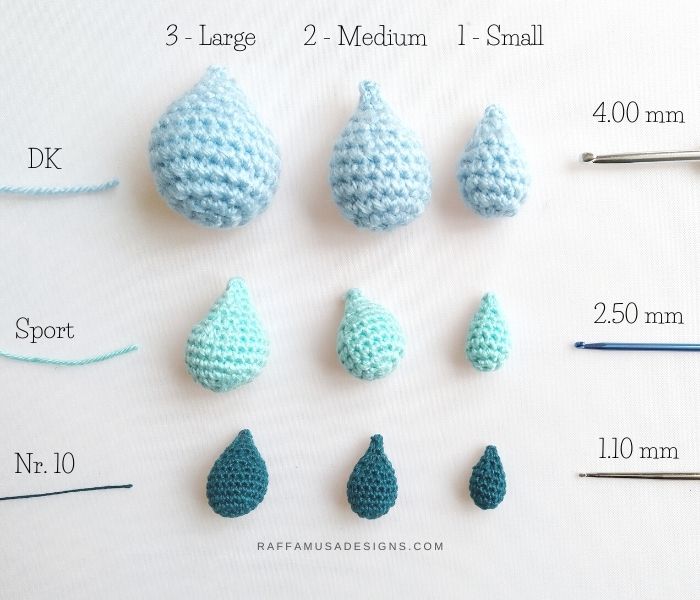
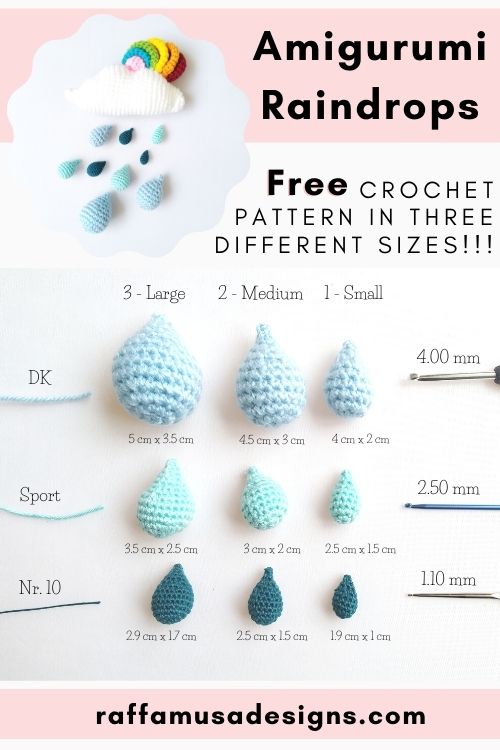
The final size of these drops largely depends on the yarn and hook you’re going to use.
As a reference, in the image below, you can check what sizes I got with different yarns and hooks. I hope this will help you make a decision based on what size you’d like to achieve.

Raindrop 1 – Small
- 4.00 mm Crochet Hook and DK Yarn: 1.5” (4 cm) by 0.8” (2 cm)
- 2.50 mm Crochet Hook and Sport Yarn: 1” (2.5 cm) by 0.6” (1.5 cm)
- 1.10 mm Crochet Hook and Mercerized Cotton n 10: 0.75” (1.9 cm) by 0.4” (1 cm)
Raindrop 2 – Medium
- 4.00 mm Crochet Hook and DK Yarn: 1.75” (4.5 cm) by 1.25” (3 cm)
- 2.50 mm Crochet Hook and Sport Yarn: 1.25” (3 cm) by 0.8” (2 cm)
- 1.10 mm Crochet Hook and Mercerized Cotton n 10: 1” (2.5 cm) by 0.6” (1.5 cm)
Raindrop 3 – Large
- 4.00 mm Crochet Hook and DK Yarn: 2” (5 cm) by 1.5” (3.5 cm)
- 2.50 mm Crochet Hook and Sport Yarn: 1.4” (3.5 cm) by 1” (2.5 cm)
- 1.10 mm Crochet Hook and Mercerized Cotton n 10: 1.15” (2.9 cm) by 0.7” (1.7 cm)
Gauge
This pattern is too small to accurately determine the gauge.
Just keep in mind that the size of the Amigurumi Raindrops will vary depending on the yarn you choose, your hook size, and your crochet tension.
Crochet Abbreviations (US Terms)
Ch – Chain
Inv Dec – Invisible Decrease
MC – Magic Circle
Sc – Single Crochet
Sk – Skip
Sl St – Slip Stitch
St – Stitch
Yo – Yarn Over
Special Stitches
Magic Circle (MC)
Please, take a look at this tutorial on how to crochet a magic circle.
Invisible Decrease (Inv Dec)
Grab the front loop of the first st, twist your hook downwards and insert it into the top of the next st, yo, pull yarn through all loops on your hook.
If you would like more help with this, please, take a look at this full step-by-step tutorial on how to make a single crochet invisible decrease.
Increase (Inc)
One increase consists of two single crochet stitches worked in the same indicated stitch.


How to Read the Pattern
- (…) – Repeat the instructions within brackets for the indicated number of times.
- If the pattern says “5 sc”, it means that you have to make one single crochet in each of the next 5 stitches.
Pattern Notes
These crochet Amigurumi Raindrops are worked in the round. This means that you do NOT join each round with a sl st. Instead, you directly start crocheting the next set of stitches.
However, if you do not feel comfortable working in the round, just join your rounds with a sl st. The worst that can happen is that you’ll have a more visible join, definitely not the end of the world!
Raindrop 1 – Small
Make a MC.
Round 1. Work 6 sc inside the MC. (6 sts)
Round 2. 2 sc in each st around. (12 sts)
Round 3-5. 12 sc. (12 sts)
Round 6. 2 sc, 1 inv dec, 4 sc, 1 inv dec, 2 sc. (10 sts)
Stuff your raindrop.
Round 7. (1 inv dec, 3 sc) twice. (8 sts)
Round 8. 4 inc dec. (4 sts)
Tie off leaving a long tail.
Raindrop 2 – Medium
Make a MC.
Round 1. Work 6 sc inside the MC. (6 sts)
Round 2. 6 inc. (12 sts)
Round 3. (1 inc, 1 sc) 6 times. (18 sts)
Round 4-6. 18 sc. (18 sts)
Round 7. 2 sc, 1 inv dec, (4 sc, 1 inv dec) twice, 2 sc. (15 sts)
Start stuffing your raindrop.
Round 8. (1 inv dec, 3 sc) three times. (12 sts)
Round 9. 1 sc, 1 inv dec, (2 sc, 1 inv dec) twice, 1 sc. (9 sts)
Add more stuffing if needed.
Round 10. (1 inv dec, 1 sc) three times. (6 sts)
Round 11. 3 inv dec. (3 sts)
Tie off leaving a long tail and close the top of the raindrop by sewing through the top chains.
Raindrop 3 – Large
Make a MC.
Round 1. Work 6 sc inside the MC. (6 sts)
Round 2. 6 inc. (12 sts)
Round 3. (1 inc, 1 sc) 6 times. (18 sts)
Round 4. (1 inc, 2 sc) 6 times. (24 sts)
Round 5-7. 24 sc. (24 sts)
Round 8. 2 sc, 1 inv dec, (4 sc, 1 inv dec) three times, 2 sc. (20 sts)
Start stuffing your raindrop.
Round 9. (1 inv dec, 3 sc) four times. (16 sts)
Round 10. 1 sc, 1 inv dec, (2 sc, 1 inv dec) three times, 1 sc. (12 sts)
Add more stuffing if needed.
Round 11. 12 sc. (12 sts)
Round 12. (1 inv dec, 1 sc) four times. (8 sts)
Round 13. 4 inv dec. (4 sts)
Tie off leaving a long tail. Close the top of the raindrop by sewing through the top chains.
Your crochet Amigurumi Raindrops are ready!
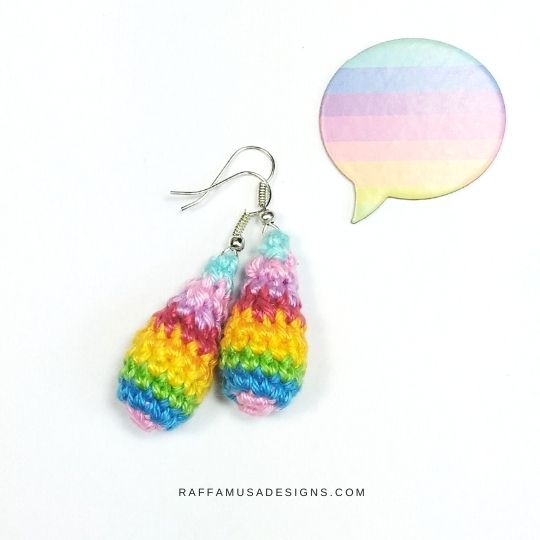
Bonus Raindrop
Would you like to crochet one small raindrop in a slightly more elongated shape than Raindrop 1? Then, make sure to check out this Drop Earrings pattern!
I hope you enjoyed crocheting these raindrops. Please, do not hesitate to contact me if you need any help or support.
I am looking forward to seeing all your beautiful makes on Facebook and Instagram!
Find more baby toy ideas here on the blog…







Congratulations. 🙂
Thank you, I cannot wait to spoil her with tons of handmade stuff 😁
Merci beaucoup