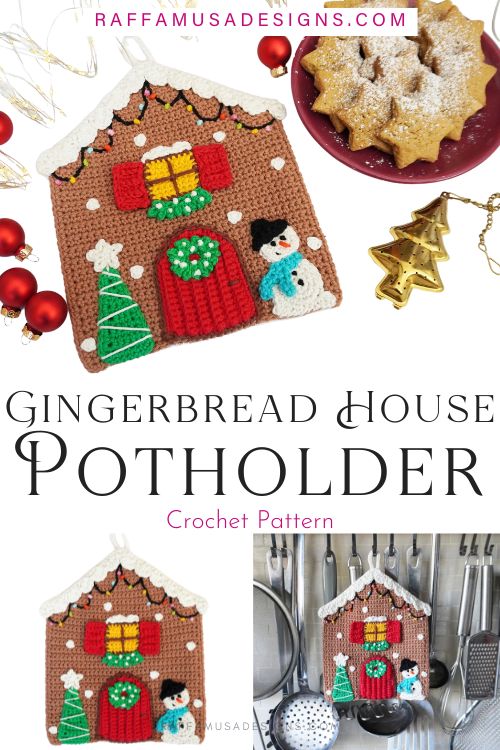
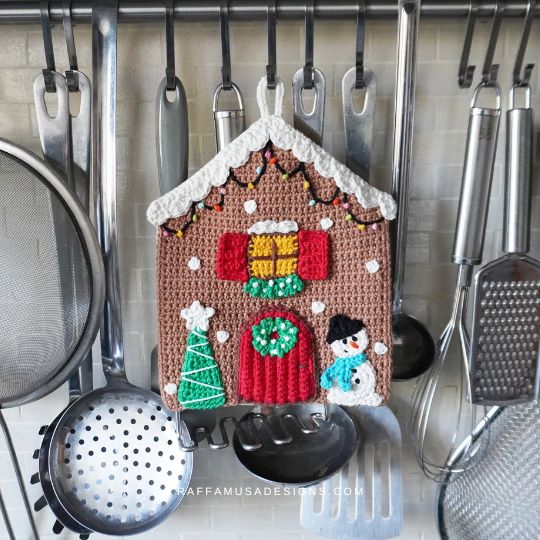
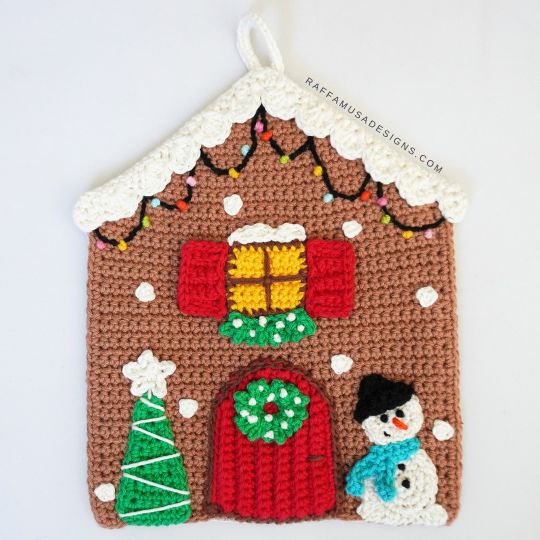
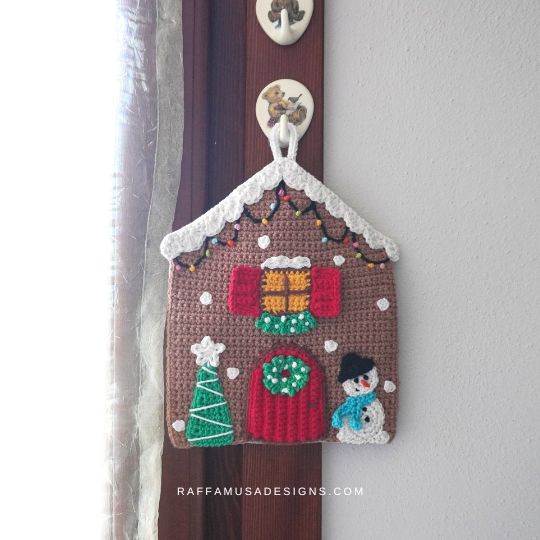
Crochet this fun Gingerbread House Potholder to cheer your kitchen decor for the Holidays! Use it as a hot pad or a wall hanging.
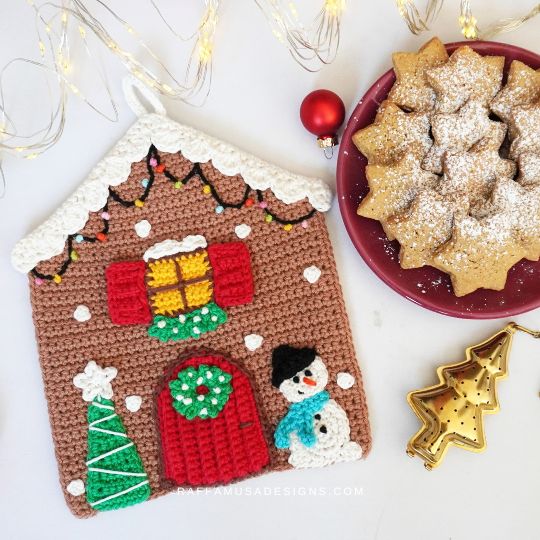
My initial idea for this gingerbread house hot pad was a little bit simpler, with fewer colors, and definitely less sewing of appliques.
Maybe I thought just a larger version of my Gingerbread House Ornament?!
However, since I was using my cotton scrap yarn, I ended up picking many colors and adding all sorts of details, from the Christmas tree and snowman on the sides of the door to Christmas wreaths, Christmas lights, piles of snow, etc.
And I love how this Christmas potholder turned out!
I’m still not sure if I want to use it as a potholder or just hang it on the wall as a Christmas wall hanging…
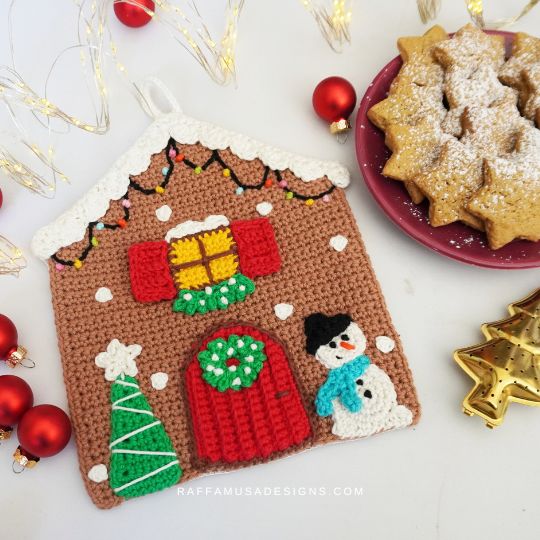
If you’re afraid about the back being kind of ugly, I hear you. In fact, I lined my gingerbread house potholder with some fabric!
You can find the detailed tutorial on how to line crochet potholders with fabric HERE.
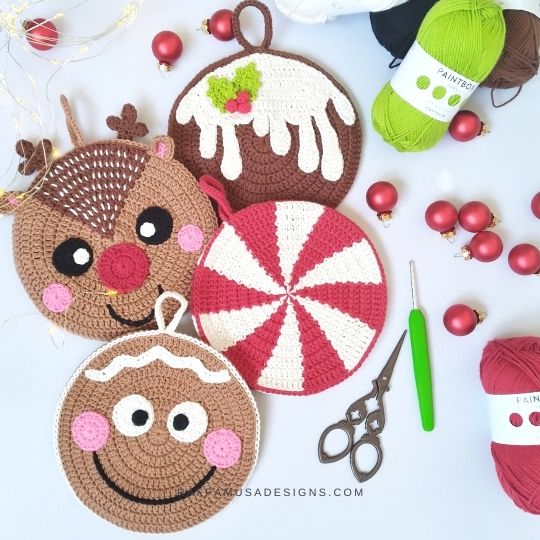
Find more crochet potholder patterns here on the blog…
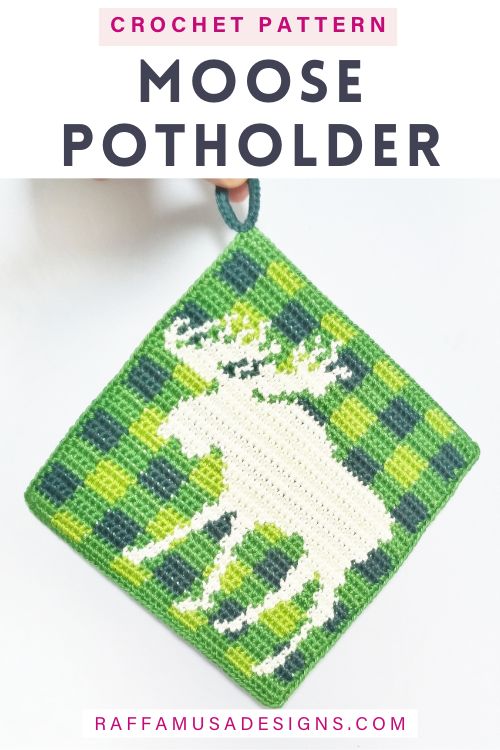
- Round Christmas Potholders
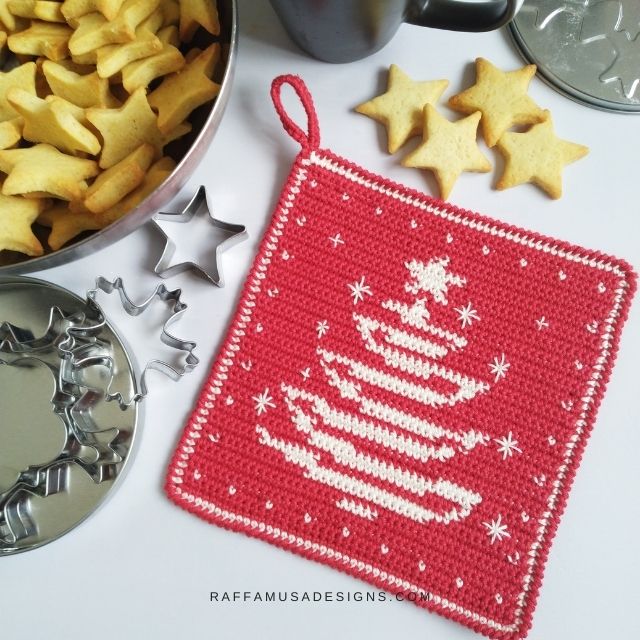
- Tapestry Crochet Christmas Tree Potholder
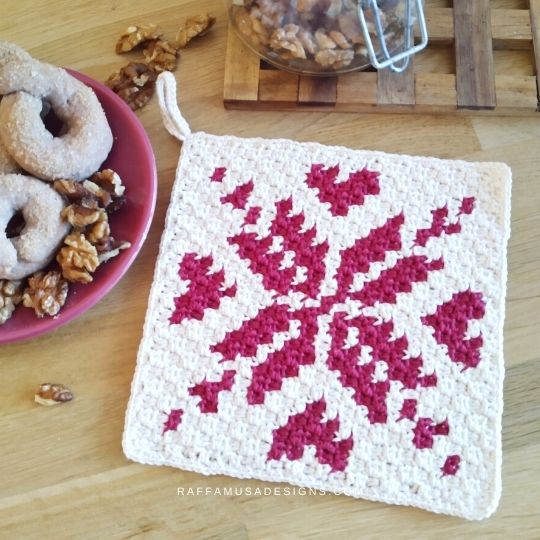
- Mini-C2C Nordic Christmas Potholder
Add this pattern to your Ravelry queue HERE and favorite it (– thank you!), or save it for later by pinning it to your best crochet board on Pinterest using this Pin!
Note: This post contains affiliate links. This means that if you purchase something through the links on my blog, I might earn a commission. This will not have any effect on the price you pay. For more info, please, see my Privacy Policy.
Giftstravaganza Blog Hop
The pattern of the Gingerbread House Potholder is featured in the Giftstravaganza Blog Hop 2023 with Underground Crafter. Check the main Giftstravaganza blog hop page HERE to get many patterns and ideas for the gift season!
AD-FREE PRINTABLE PATTERN
Get the ad-free PDF pattern of the Christmas Gingerbread House Potholder on Ravelry HERE, LoveCrafts HERE, or Etsy HERE.


Materials
- 3.5-mm (E/4 USA, 9 UK) Crochet Hook
- DK (3, Light) Cotton Yarn
- Tapestry Needle
- 3 Stitch Markers
Yarn & Yardage
I used Paintbox Yarns Cotton DK (137 yds, 125 m per 50 g) in the following colors:
- Fudge – Soft Fudge (410) – 70 yds, 64 m
- Brown – Coffee Bean (411)
- White – Champ. White (403)
- Red – Pillar Red (415)
- Green – Grass Green (430)
- Yellow – Mustard Yellow (424)
- Blue – Marine Blue (434)
- Black – Pure Black (402)
- Scraps of Orange, Pink, Light Green, Light Blue, and any other color you might have.
Feel free to use any comparable yarn that meets gauge.
Abbreviations (US Terms)
- BLO – Back Look Only
- Ch – Chain
- Dc – Double Crochet
- Dec – Decrease
- Inc – Increase
- Hdc – Half Double Crochet
- MC – Magic Circle
- Picot – Picot Stitch
- RS – Right Side
- Sc – Single Crochet
- Sc3tog – Single Crochet 3 Together
- Sk – Skip
- Sl St – Slip Stitch
- St – Stitch
- Yo – Yarn Over
Special Stitches
Back Loop Only (BLO)
Learn how to crochet in the back loop only HERE.
Decrease (Dec)
One decrease consists of 2 sts worked together. In this pattern, we’ll mainly use single crochet decreases (sc dec): insert hook in next st, yo, and pull up a loop (2 loops on your hook), insert hook in next st, yo, and pull up another loop (3 loops on your hook). Yo and pull through all 3 loops on your hook.
Increase (Inc)
One increase consists of 2 sts made in the same indicated st.
Magic Circle (MC)
Learn how to make a magic circle or adjustable ring HERE.
Picot Stitch (Picot)
Ch 3, sl st in back bump of first-made ch.
Single Crochet 3 Together (Sc3tog)
(Insert hook in next st, yo, pull up a loop) 3 times (4 loops on your hook), yo, pull through all 4 loops on your hook
Size
6.5″ (16.5 cm) wide by 7.9″ (20 cm) at the tallest point (without the hanging loop)
Gauge
22.5 sc sts for 25 rows in 4″ (10 cm).
Pattern Notes
- If the pattern says “sc 2“, you must crochet 2 sc in the next 2 sts.
- (…) – Crochet the instructions within round brackets for the indicated number of times.
- *… and **… – Crochet the instructions from * or ** for the indicated number of times.
- […] – Crochet the instructions within square brackets all in the same indicated st.
- The stitch count is indicated within parentheses at the end of each line of instructions.
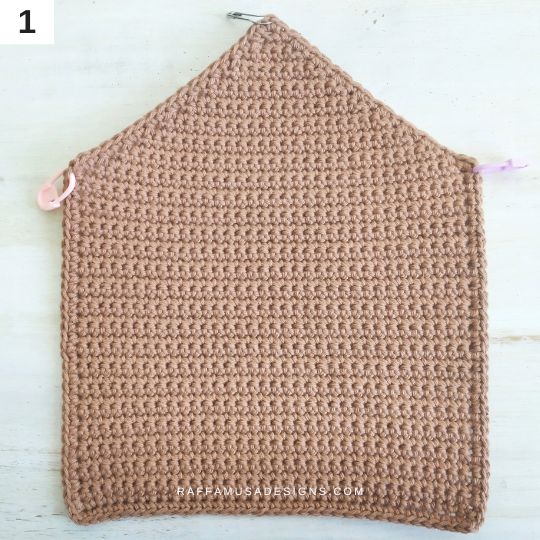
Gingerbread House Hot Pad – Free Crochet Pattern
Gingerbread House
With fudge, ch 36.
Row 1 (RS). Sc in each ch starting from the second ch from your hook. (35 sts)
Rows 2-33. Ch 1, turn. Sc in each st across. (35 sts)
Row 34. Ch 1, turn. Sk 1, sc 32, sc dec 1. (33 sts)
Row 35. Ch 1, turn. Sk 1, sc 30, sc dec 1. (31 sts)
Row 36. Ch 1, turn. Sk 1, sc 28, sc dec 1. (29 sts)
Row 37. Ch 1, turn. Sk 1, sc 26, sc dec 1. (27 sts)
Row 38. Ch 1, turn. Sk 1, sc 24, sc dec 1. (25 sts)
Row 39. Ch 1, turn. Sk 1, sc 22, sc dec 1. (23 sts)
Row 40. Ch 1, turn. Sk 1, sc 20, sc dec 1. (21 sts)
Row 41. Ch 1, turn. Sk 1, sc 18, sc dec 1. (19 sts)
Row 42. Ch 1, turn. Sk 1, sc 16, sc dec 1. (17 sts)
Row 43. Ch 1, turn. Sk 1, sc 14, sc dec 1. (15 sts)
Row 44. Ch 1, turn. Sk 1, sc 12, sc dec 1. (13 sts)
Row 45. Ch 1, turn. Sk 1, sc 10, sc dec 1. (11 sts)
Row 46. Ch 1, turn. Sk 1, sc 8, sc dec 1. (9 sts)
Row 47. Ch 1, turn. Sk 1, sc 6, sc dec 1. (7 sts)
Row 48. Ch 1, turn. Sk 1, sc 4, sc dec 1. (5 sts)
Row 49. Ch 1, turn. Sk 1, sc 2, sc dec 1. (3 sts)
Row 50. Ch 1, turn. Sk 1, sc dec 1. (1 st)
Do not fasten off but move directly to the border.
Border
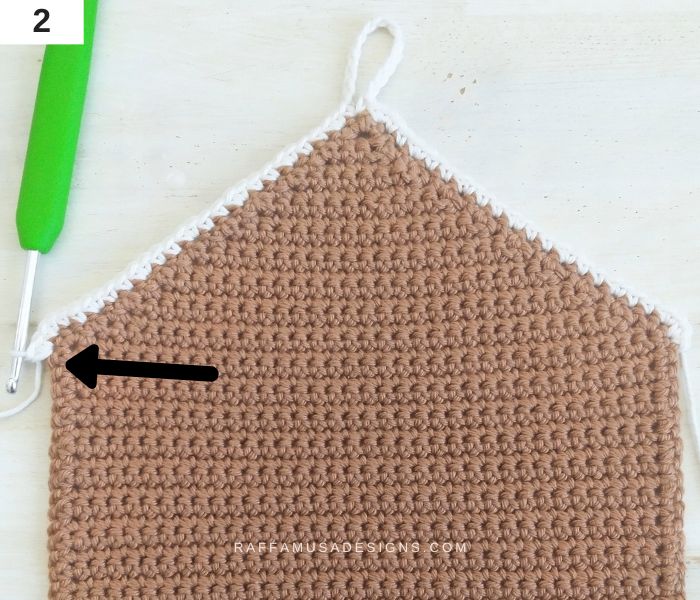
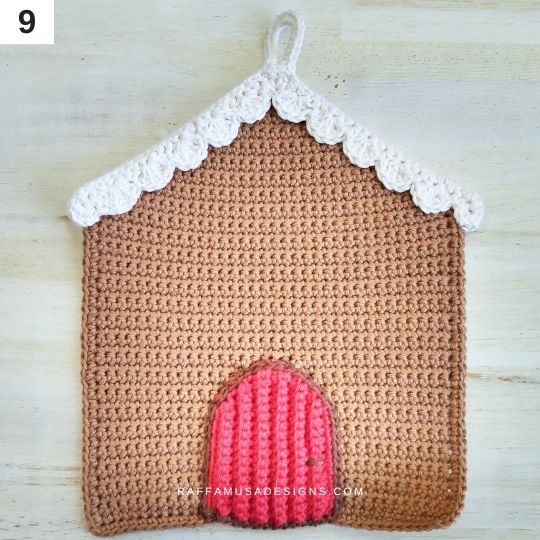
Round 1. Ch, turn (RS). Sc 1 in st from row 50, sc 16 working on the sides of rows 50-35, [sc 3] on the side of row 34 (mark third sc of 3), sc 33 working on the sides of rows 33-1. Ch 1, sc 35 on the free loops of initial ch, ch 1, sc 33 working on the sides of rows 1-33. [Sc 3] on the side of row 34 (mark first sc of 3), sc 16 working on the sides of rows 35-50. [Sc 2] more in st from row 50 (mark second sc of 2). Sl st in first st to join (photo 1).
Fasten off and weave in your ends.
Roof
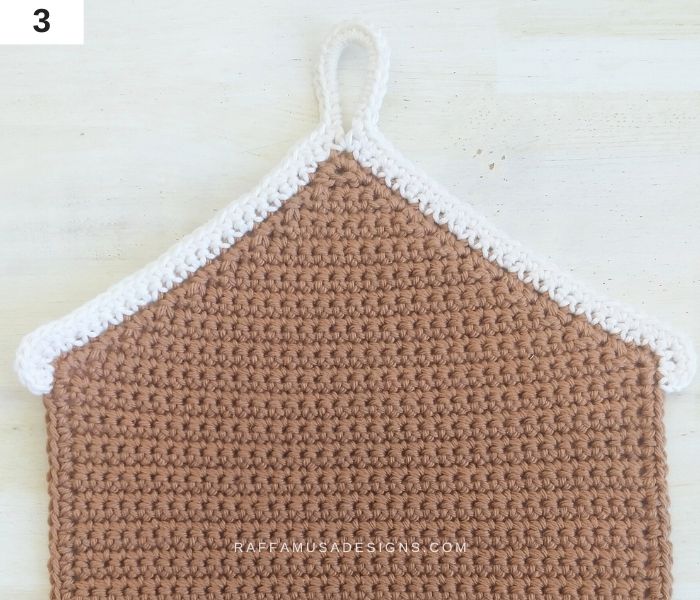
Turn to WS, and join white in the first st marker.
Row 1 (WS). Sc inc 2, (sc 2, sc inc 1) 6 times, sc 1, [sc 1, ch 13 (hanging loop), sc 1] in next marked st, sc 1, (sc inc 1, sc 2) 6 times, sc inc 2, sl st in next st of the house (photo 2).
Row 2 (RS). Ch 1, turn. Sk first sl st, sc 1 in next sc. Sc inc 2, sc 26, sc 20 inside hanging loop (or as many sts needed to fill the loop), sc 26, sc inc 2, sc 1, sl st in next st of the house.
Fasten off and weave in your ends (photo 3).
Snow on the Roof
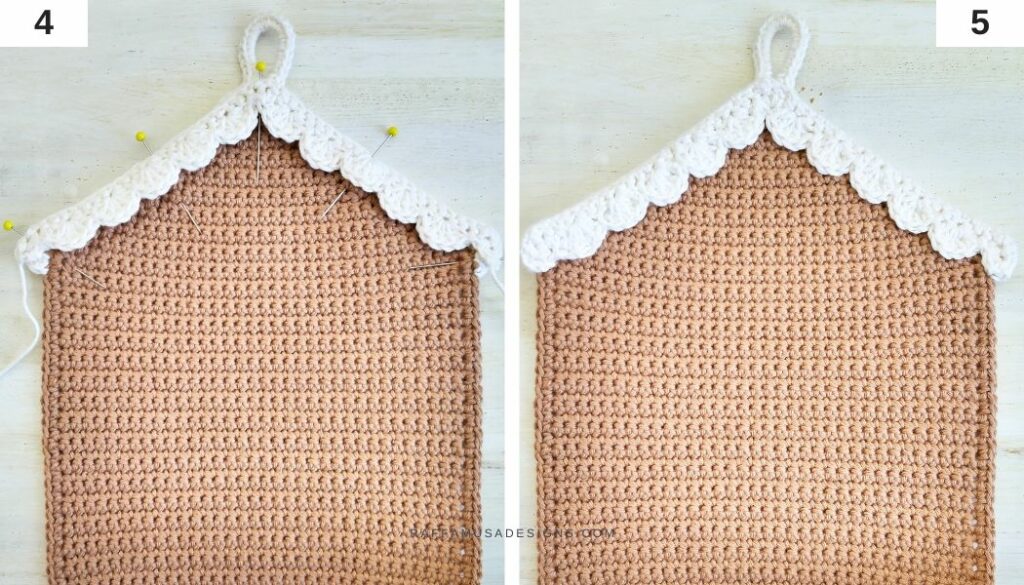
With white, ch 58.
Row 1 (WS). Sc 1 in second ch from hook, sc dec 2, sc 22, sc3tog, sc 22, sc dec 2, sc 1. (51 sts)
Row 2 (RS). Ch 1, turn. Sc dec 2, *sk 1, [dc 5 (scallop)] in next st, sk 1, sl st in next st. Repeat from * 5 times. Sc3tog, **sk 1, [dc 5] in next st, sk 1, sl st in next st. Repeat from ** 5 times. Sc dec 2. (5 sts, 10 scallops)
Fasten off leaving a long tail (about 50″ / 127 cm) for sewing.
Assembly
- Place the snow over the roof and pin it in place (photo 4).
- Sew row 2 of the snow with row 2 of the roof (photo 5).
- Weave in all your ends.
Door
With red, ch 14.
Row 1. Sc 1 in second ch from hook, sc 12. (13 sts)
Row 2. Ch 1, turn. BLO sc 12, BLO sc inc 1. (14 sts)
Row 3. Ch 1, turn. BLO sc inc 1, BLO sc 13. (15 sts)
Row 4. Ch 1, turn. BLO sc 14, BLO sc inc 1. (16 sts)
Row 5. Ch 1, turn. BLO sc inc 1, BLO sc 15. (17 sts)
Row 6. Ch 1, turn. BLO sc 16, BLO sc inc 1. (18 sts)
Rows 7-8 (2 rows). Ch 1, turn. BLO sc 18. (18 sts)
Row 9. Ch 1, turn. BLO sc dec 1, sc 16. (17 sts)
Row 10. Ch 1, turn. BLO sc 15, BLO sc dec 1. (16 sts)
Row 11. Ch 1, turn. BLO sc dec 1, BLO sc 14. (15 sts)
Row 12. Ch 1, turn. BLO sc 13, BLO sc dec 1. (14 sts)
Row 13. Ch 1, turn. BLO sc dec 1, BLO sc 12 closing the last st with brown. (13 sts)
Do not fasten off but continue to the border.
Border
Continue with brown.
Round 1. Sl st 13 along the bottom side of the door (photo 6), ch 1, sl st 13 crocheting in the free loops of initial ch (photo 7).
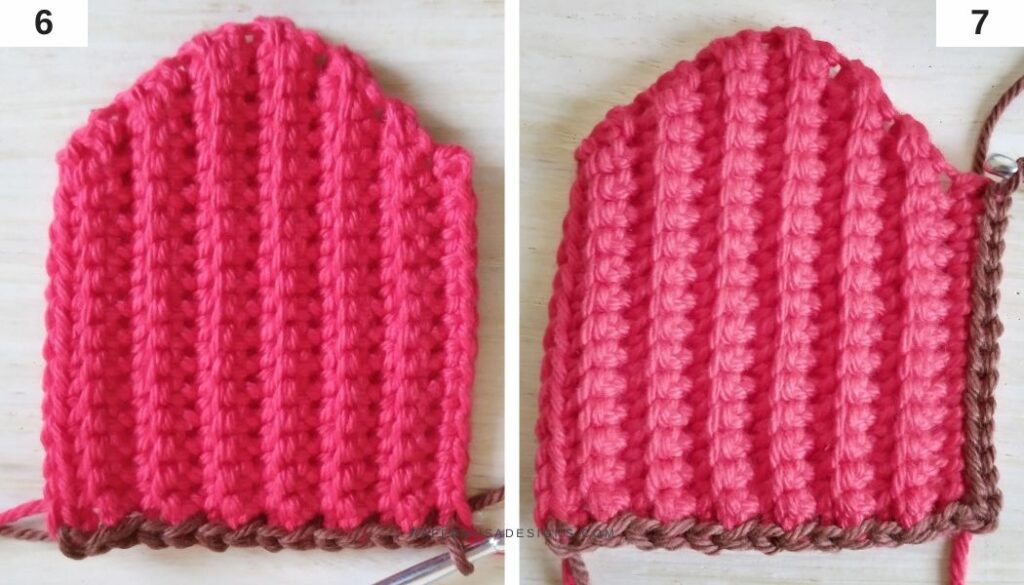
Sl st loosely working on the side of rows 1-13 of the door, BLO sl st 13 working in the sts of row 13. Ch 1, sl st in first st of the round to join (photo 8).
Fasten off leaving a long tail for sewing.

Assembly
Weave in the red ends of the door. Then, using the long, brown tail, sew the door in the center of the house with the lower side just above the border.
Before weaving in your ends, make a couple of short sts to embroider the handle of the door (photo 9).
Christmas Wreath
With green, ch 12, sl st in the first ch to form a ring.
Round 1. (Picot 1, sl st in first ch of ring) twice. *Sl st in next st on the ring, (picot 1, sl st in same st on the ring) twice. Repeat from * 11 times. (24 picots)
Fasten off leaving a long tail for sewing.
Window
With yellow, ch 9.
Row 1. Sc 1 in second ch from hook, sc 7. (8 sts)
Rows 2-6 (5 rows). Ch 1, turn. Sc across. (8 sts)
Row 7. Ch 1, turn. Sc across closing the last st with brown. (8 sts)
Do not fasten off but continue with the border.
Border
Continue with brown.
Round 1. Sc 7 along the left side, ch 1, sc 8 on the other side of initial ch, ch 1, sc 7 along the right side, ch 1, sc 8 on the top side, ch 1, sl st in first sc to join. (30 sts, 1 ch-1 sp at each corner)
Fasten off leaving a long tail for sewing.
Window Blinds
(Make two)
With red, ch 5.
Row 1. Sc 1 in second ch from your hook, sc 3. (4 sts)
Rows 2-6 (5 rows). Ch 1, turn. Sc across. (4 sts)
Border
Continue with red.
Round 1. Sl st all around. Ch 1 at each corner.
Fasten off leaving a long tail for sewing.
Window Decoration
With green, ch 10.
Row 1. Sl st 1 in second ch from hook, (picot 1, sl st 1 in next st) 8 times. (8 picots, 9 sl sts)
Fasten off leaving a long tail for sewing.
Snow over the Window
With white, ch 10.
Row 1. Sc 1 in second ch from hook, hdc 1, sl st 2, sc 1, hdc 1, sc 1, sl st 2. (9 sts)
Fasten off leaving a long tail for sewing.
Fir Tree Applique
With green, ch 2.
Row 1 (WS). Sc 1 in the second ch from hook. (1 st)
Row 2 (RS). Ch 1, turn. Sc inc 1. (2 sts)
Row 3. Ch 1, turn. Sc across. (2 sts)
Row 4. Ch 1, turn. Sc inc 1, sc 1. (3 sts)
Row 5. Ch 1, turn. Sc across. (3 sts)
Row 6. Ch 1, turn. Sc 2, sc inc 1. (4 sts)
Row 7. Ch 1, turn. Sc across. (4 sts)
Row 8. Ch 1, turn. Sc inc 1, sc 3. (5 sts)
Row 9. Ch 1, turn. Sc across. (5 sts)
Row 10. Ch 1, turn. Sc 4, sc inc 1. (6 sts)
Row 11. Ch 1, turn. Sc across. (6 sts)
Row 12 (RS). Ch 1, turn. Sc inc 1, sc 5. (7 sts)
Do not fasten off but continue to the border.
Border
Continue with green.
Round 1 (RS). Sc all around. At the tip (row 1 of the tree), [sc 3] in the same ch as the first sc of the tree.
Fasten off leaving a long tail for sewing.
Star Ornament
With white, make one little star ornament following the same pattern as described HERE.
Snowman Applique
Body
Crochet in the round working in a spiral.
With white, make a MC.
Round 1. Sc 6. (6 sts)
Round 2. Sc inc 6. (12 sts)
Round 3. (Sc inc 1, sc 1) 6 times. (18 sts)
Round 4. (Sc 2, sc inc 1) 6 times. (24 sts)
Row 5 (base of the snowman). Dc 1 in the next st. Ch 1, sc 2 along the post of the last dc. Working on the sts from round 4, sc 1, sl st 3, [sc 1, ch 1, dc 1] in next st. Ch 1, sl st 1 along the post of last dc, sl st in same st of round 4 as last dc. Leave the rest of the sts unworked. (11 sts)
Fasten off leaving a long tail for sewing.
Head
Crochet in the round working in a spiral.
With white, make a MC.
Round 1. Sc 6. (6 sts)
Round 2. Sc inc 6. (12 sts)
Round 3. (Sc inc 1, sc 1) 6 times. (18 sts)
Fasten off leaving a long tail for sewing.
Hat
With black, ch 3.
Row 1. Sc 1 in second ch from hook, sc 1. (2 sts)
Row 2. Ch 1, turn. Sc inc 2. (4 sts)
Row 3. Ch 1, turn. Sc across. (4 sts)
Row 4. Ch 2, turn. Sc 1 in second ch from hook, sc 3, sc inc 1. (6 sts)
Fasten off leaving a long tail for sewing.
Scarf
With blue, ch 6.
Row 1. Sc 1 in second ch from hook, sc 4. (5 sts)
Row 2. Ch 6, turn. Sc in second ch from hook, sc 4, sl st in second-to-last st of row 1. Ch 5, sc in second ch from hook, sc 3, sl st in second-to-last st of row 1.
Fasten off leaving a long tail for sewing.
Snowflakes
(Make 8 or more)
With white, make a MC.
Round 1. Sc 3 in MC. (3 sts)
Fasten off leaving a long tail for sewing, and join the round by making an invisible join.
Assembly
Using the long tail of brown yarn, sew the window in the center of the house, a few rows above the door. Before weaving in your end, embroider a cross over the window to make the wood frame.
Sew the window blinds on the sides of the window by sewing one long side of the blind over the corresponding brown side of the window.
Sew the body of the snowman on the right of the door with the base of the body (row 5) over the bottom side of the house.
Then, attach the head just above the body (photo 10).
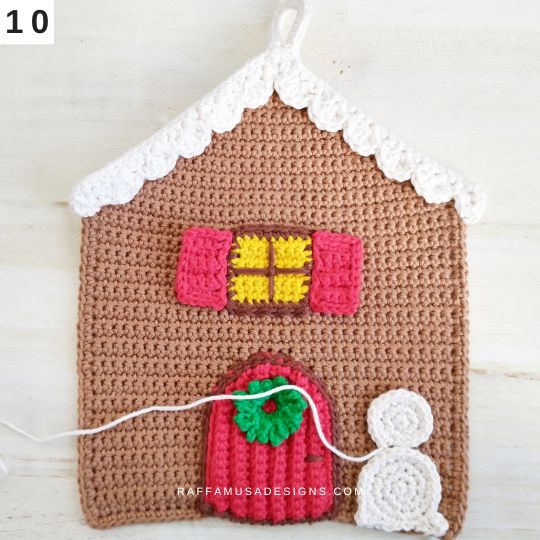
Cover the gap between the body and the head by sewing the scarf over it, and sew the hat over the top part of the head.
With a length of orange, embroider the nose of the snowman, and with a length of black, embroider the eyes, the mouth, and a few buttons over the body of the snowman.
Attach the fir tree applique to the left of the door with the largest part of the tree over the bottom side of the house.
Sew the star ornament over the tip of the tree, and with a length of white, embroider a decorative garland.
Sew the Christmas wreath over the door and the window decoration over the bottom side of the window.
With a length of white, embroider a few decorative knot sts all over the garland and the window decoration.
Attach the snow over the window just above the top side of the window.
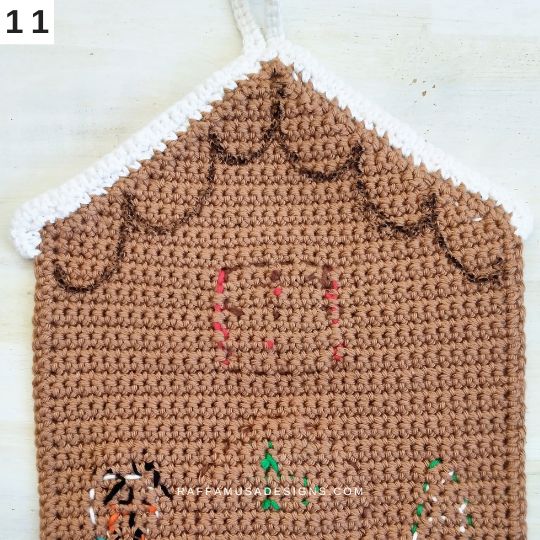
With a length of black, embroider a string of lights just below the roof. Before you start embroidering, you can draw some guiding lines on the back of the potholder (photo 11).
Use yarn scraps of different colors to embroider a few knot sts along the entire line to make the Christmas lights.
Finally, attach the snowflakes all over the gingerbread house.
Weave in all your ends.
Lining
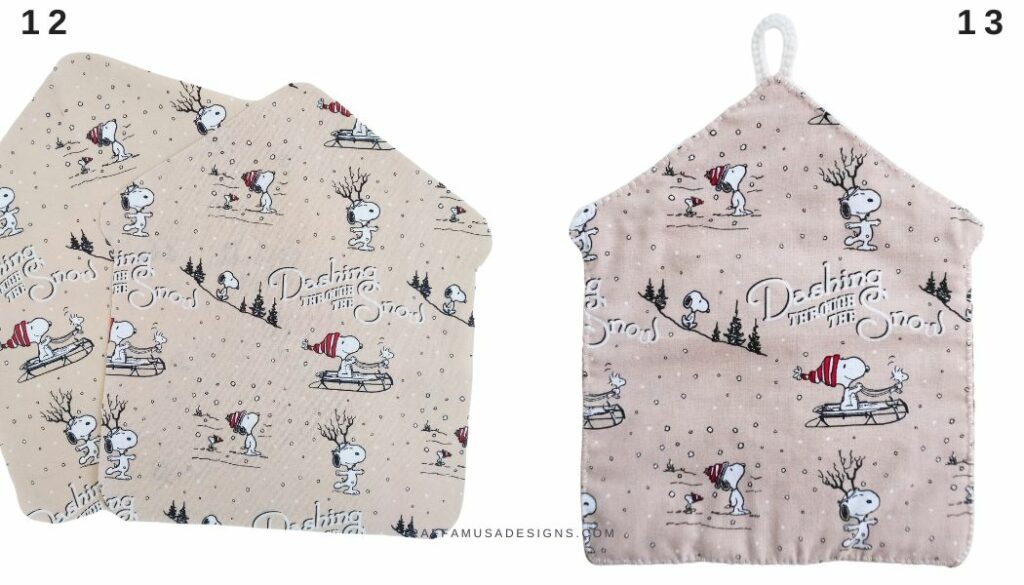
Line your crochet potholder with fabric (photos 12-13) following this tutorial HERE.
Your crochet gingerbread house potholder is ready!
I hope you enjoyed this free crochet pattern, and I’d love to see your potholders! Please, share a pic of your work on Facebook and Instagram using the hashtag #raffamusadesigns!
Find more crochet potholder patterns here on the blog…