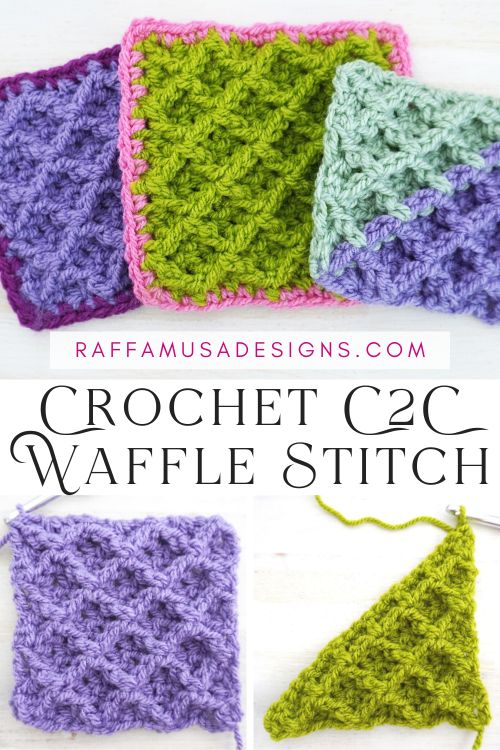
The crochet corner-to-corner (C2C) waffle stitch is a fun variation of the classic waffle stitch, one of the most iconic crochet stitches! Learn how to crochet this beautiful bias stitch with my step-by-step photo and video tutorial.
If you know the classic waffle stitch, you can immediately appreciate the interesting twist that crocheting corner-to-corner (C2C) adds to this stitch.
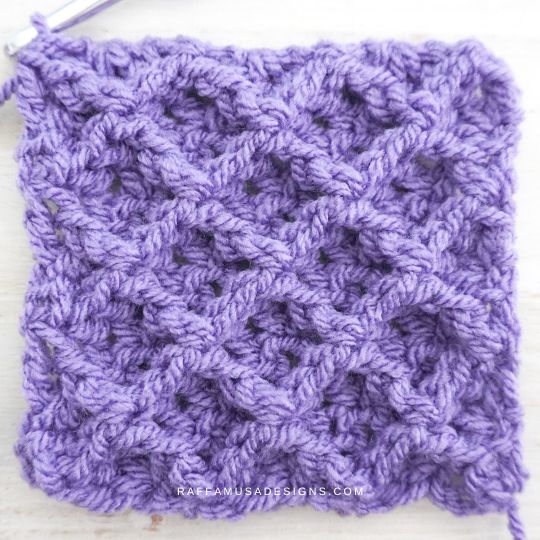
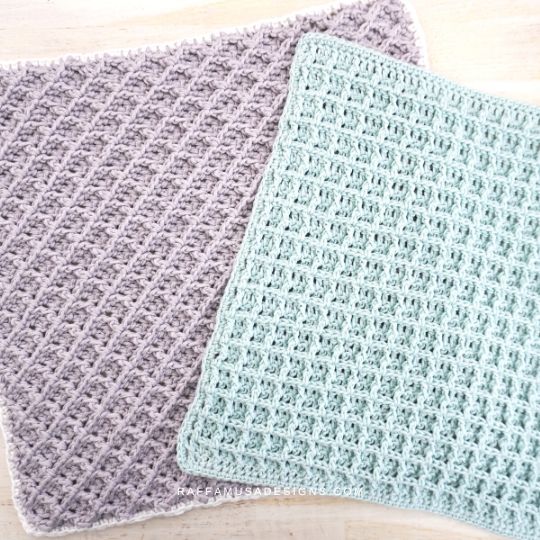
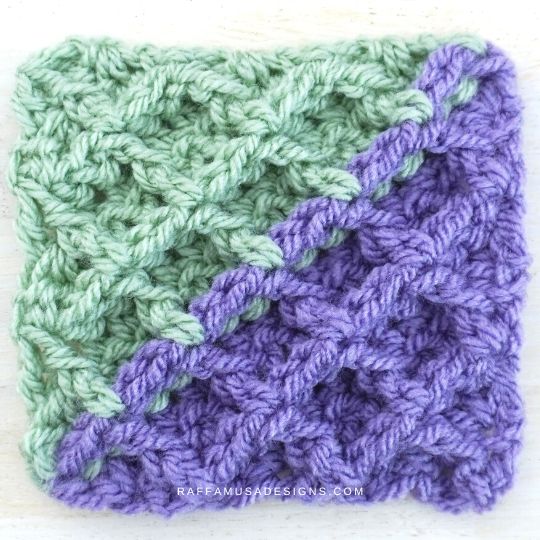
In the picture below, you can see two waffle stitch swatches. The swatch on the left is made with the C2C waffle stitch, and the one on the right is made with the classic waffle stitch.
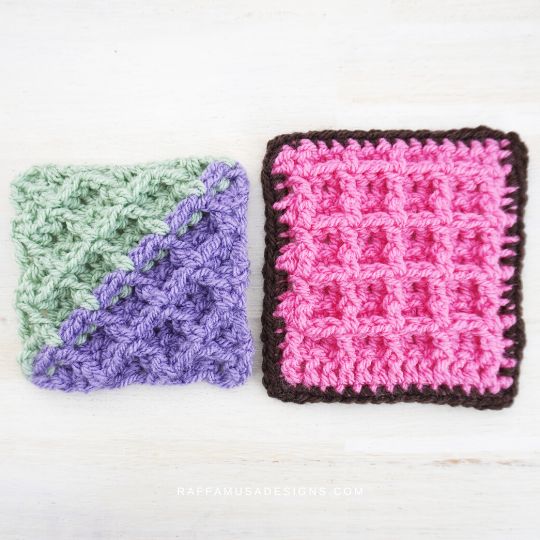
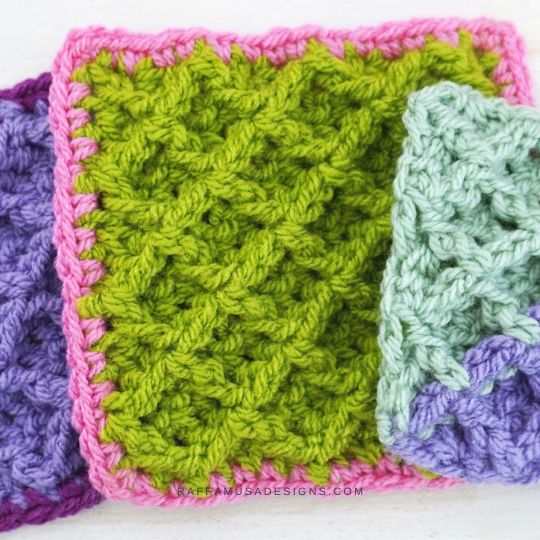
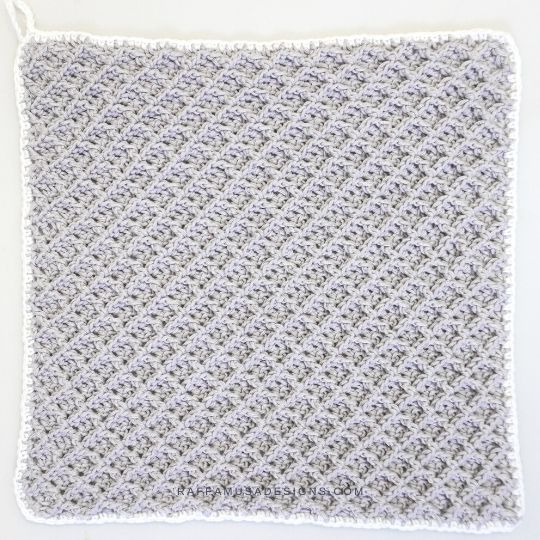
The photo below shows another example of two larger squares that I crocheted using either the C2C or the classic waffle stitch.
In a way, the C2C waffle stitch creates a similar texture as the diamond stitch but in my opinion, it is much easier to crochet!
How to Crochet the C2C Waffle Stitch
The C2C waffle stitch is crocheted in a biased direction, i.e. from one corner to the other.
As for all C2C stitches, you will start crocheting from one corner, and at each row, you’ll increase the stitch count. When you’re happy with the size of your project, you’ll decrease until you get to the opposite corner compared to the initial one.
Of course, the basic waffle stitch pattern is maintained throughout the project. So, you’ll still use double crochets and front post double crochets.
C2C Waffle Stitch – Video Tutorial
What to Crochet with the C2C Waffle Stitch
The C2C waffle stitch is perfect for a large number of projects, including:
- Blankets
- Home decor projects
- Washcloths
- Hats and winter accessories
- Bags
To make it easier to navigate through this post, I organized it in different sections so that you can jump directly to the one you’re interested in:
Save this crochet stitch tutorial for later by pinning it to your favorite crochet board using this pin!
Note: This post contains affiliate links. This means that if you purchase something through the links on my blog, I might earn a commission. This will not have any effect on the price you pay. For more info, please, see my Privacy Policy.
MATERIALS
- Yarn of choice
Appropriate hook size (I suggest you go up 1 or 2 hook sizes compared to the one recommended on the yarn label)
For this tutorial, I used Aran-weight acrylic yarn (Paintbox Yarns Simply Aran) and a 6.0-mm (J/10 US, 4 UK) crochet hook.
ABBREVIATIONS (US TERMS)
- 2FPdc/dc3tog – 2 Front Post Double Crochet / Double Crochet 3 Together
- Ch – Chain
- Ch-less dc – Chainless Starting Double Crochet
- Dc – Double Crochet
- Dc/2FPdc3tog – Double Crochet / 2 Front Post Double Crochet 3 Together
- Dc/FPdc2tog – Double Crochet / Front Post Double Crochet 2 Together
- Dc/FPdc/dc3tog – Double Crochet / Front Post Double Crochet / Double Crochet 3 Together
- FPdc – Front Post Double Crochet
- FPdc/dc2tog – Front Post Double Crochet / Double Crochet 2 Together
- RS – Right Side
- Sc – Single Crochet
- Sk – Skip
- St – Stitch
- WS – Wrong Side
- Yo – Yarn over
Special Stitches
Dc/2FPdc3tog and 2FPdc/dc3tog
These two stitches are used to work the decreases on the WS of the work and they are explained in more detail in the step-by-step tutorial below.
Dc/FPdc2tog and FPdc/dc2tog
These two stitches are used to work the decreases on the RS of the fabric and are explained in more detail in the step-by-step tutorial below.
Dc/FPdc/dc3tog
This is the last st of the decrease section, and you’ll also find step-by-step instructions in the photo tutorial below.
PATTERN NOTES
- If the pattern says “sc 2”, you have to crochet 1 sc in each of the next 2 sts.
- (…) – Repeat the instructions within round parenthesis for the indicated number of times.
- *… – Repeat the instructions from * for the indicated number of times.
- […] – Crochet the instructions within brackets all in the same indicated st.
Corner-to-Corner (C2C) Waffle Stitch – Quick Pattern
Increases
Chain 4.
Row 1 (WS). [Dc 2] in the first made ch (the turning ch-3 count as your first dc). (3 sts)
Row 2 (RS). Turn, [ch-less dc 1, dc 2] in first st, FPdc 1, [dc 3] in last st. (7 sts)
Row 3. Turn, [ch-less dc 1, dc 1] in first st, FPdc 2, dc 1, FPdc 2, [dc 2] in last st. (9 sts)
Row 4 (RS). Turn, [ch-less dc 1, dc 2] in first st, *FPdc 1, dc 2. Repeat from * until you have 2 sts left. FPdc 1, [dc 3] in last st. (you will increase by 2 sts on each side for a total of 4 sts per row)
Row 5 (WS). Turn, [ch-less dc 1, dc 1] in first st, *FPdc 2, dc 1. Repeat from * until you have 3 sts left. FPdc 2, [dc 2] in last st. (you will increase 1 st on each side for a total of 2 sts per row)
Repeat rows 4 and 5 to grow your work.
Decreases
You can start decreasing on either the RS or WS of the work.
Here, I’ll give you the general rule for decreasing on either side and I’ll call the rows “Row X” for the RS and “Row Y” for the WS.
Row X (RS). Ch 1 (does not count as a st here and throughout), turn. Dc/FPdc2tog, *dc 2, FPdc 1. Repeat from * until you have 4 sts left. Dc 2, FPdc/dc2tog. (you will decrease 1 st on each side for a total of 2 sts per row)
Row Y (WS). Ch 1, turn. Dc/2FPdc3tog, *dc 1, FPdc 2. Repeat from * until you have 4 sts left. Dc 1, 2FPdc/dc3tog. (you will decrease 2 sts per side for a total of 4 sts per row)
Repeat rows X and Y to decrease your work.
When you get to the second-to-last row, you should have 3 sts.
Last Row (RS). Dc/FPdc/dc3tog. (1 st)
Crochet C2C Waffle Stitch – Step-by-Step Tutorial
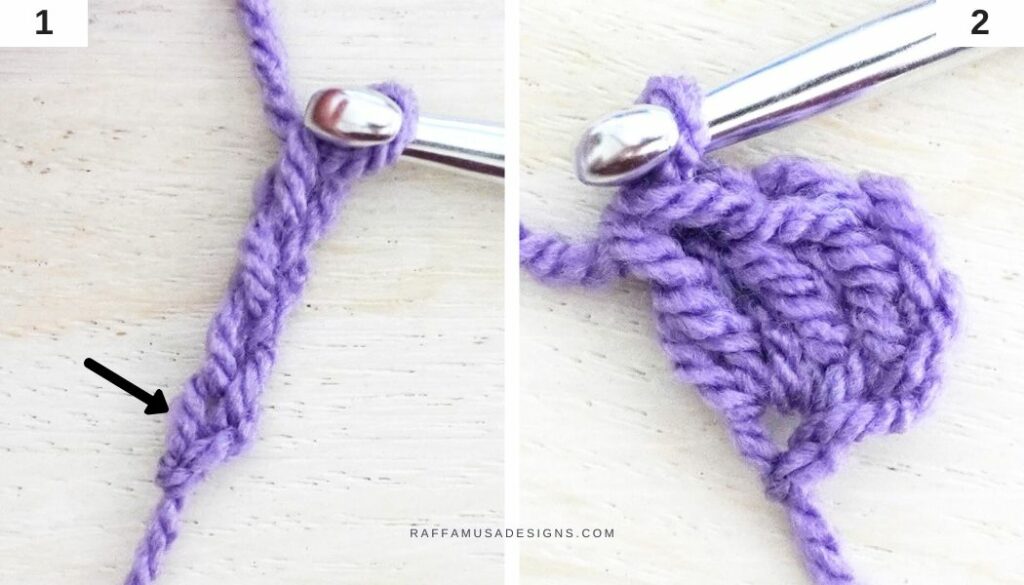
Row 1
Ch 4.
[Dc 2] in first-made ch (indicated by the arrow in photo 1). Remember that the turning ch-3 counts as your first dc! (3 sts, photo 2)
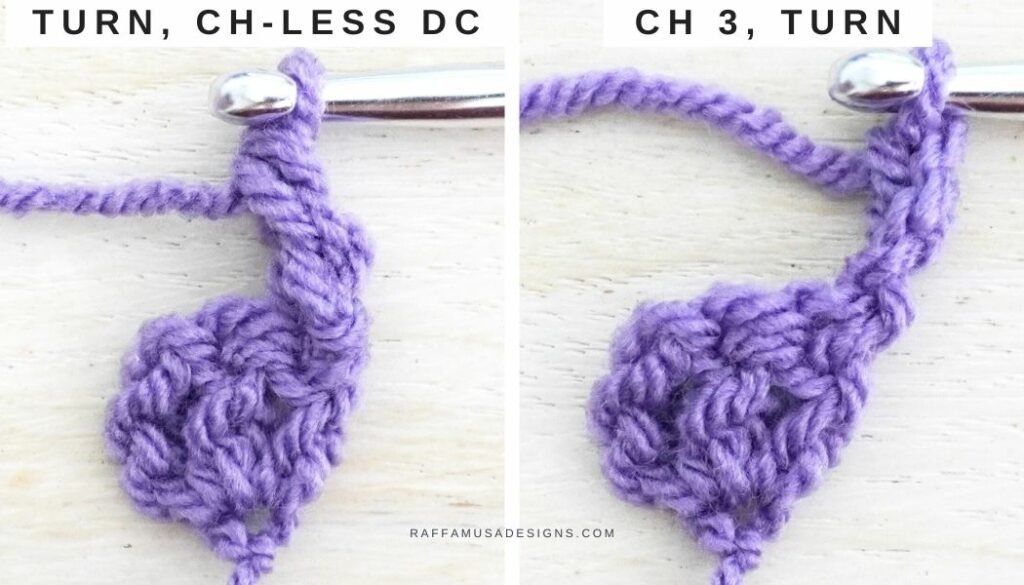
Row 2 (RS)
You can go about starting each new row in several ways.
My favorite method is to turn and ch-less dc in the first st (see the left panel in the picture below), which is the one I wrote in the pattern.
However, you could also chain 3 and turn (shown on the right in the picture below). In this case, the turning ch-3 would be your first dc!
One last option is to ch 2 (which don’t count as a st), and dc in the first st.
Just choose your favorite method for turning. It does not matter which one.
Alright, back to the pattern for row 2:
Turn, [ch-less dc 1, dc 2] in the first st (you need to have 3 sts in the first st! See photo 3), FPdc 1, [dc 3] in the last st (photo 4). (7 sts)

Row 3 (WS)
Turn, [ch-less dc 1, dc 1] in the first st (you need to have 2 sts in the first st), FPdc 2 (working around the post of the sts marked with the white and orange stitch markers in photo 5), dc 1 (in the st marked with the yellow stitch marker in photo 5).
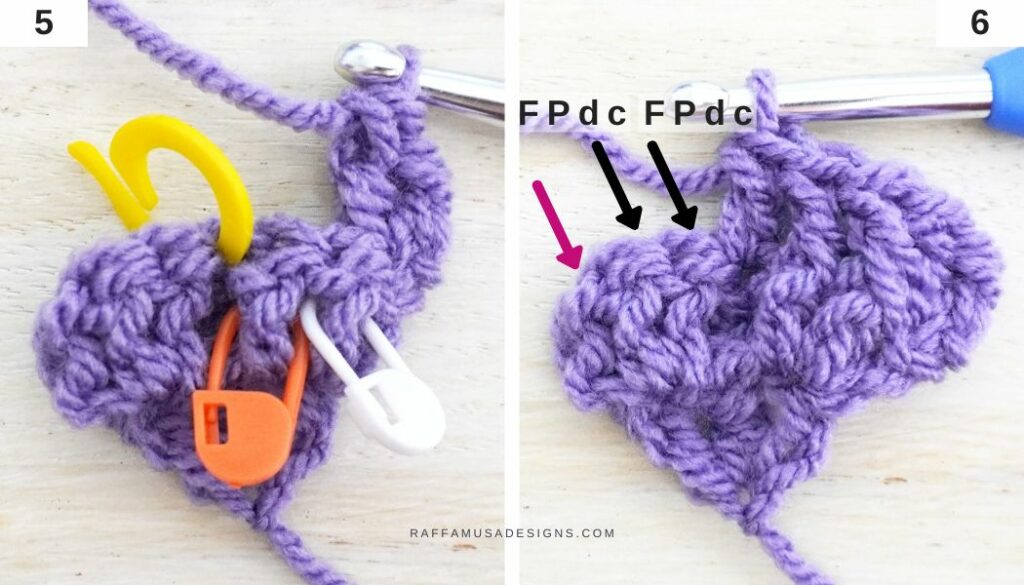
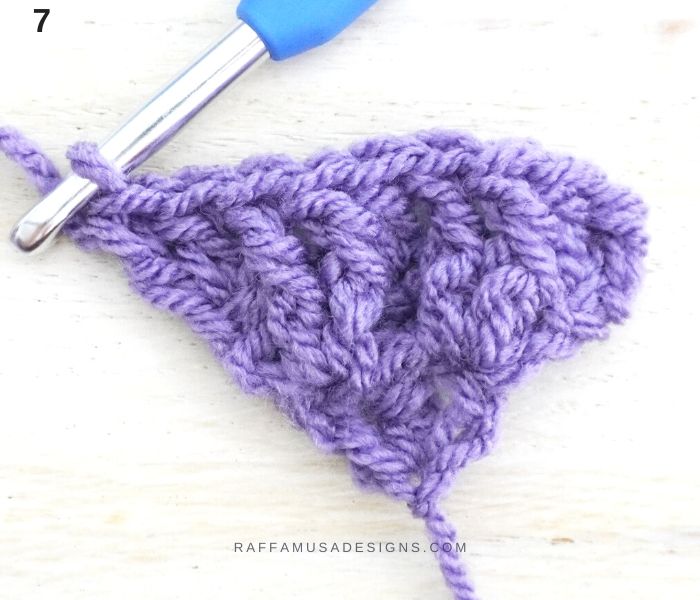
FPdc 2 (see black arrows in photo 6), [dc 2] in the last st (see pink arrow in photo 6). (9 sts, photo 7)
Row 4 (RS)
Turn, [ch-less dc 1, dc 2] in the first st, *FPdc 1 in the next st (see st marked with the orange st marker in photo 8), dc 2 (1 dc in each of the sts marked with a yellow st marker in photo 8). Repeat from * once more (you will have 2 sts left!).
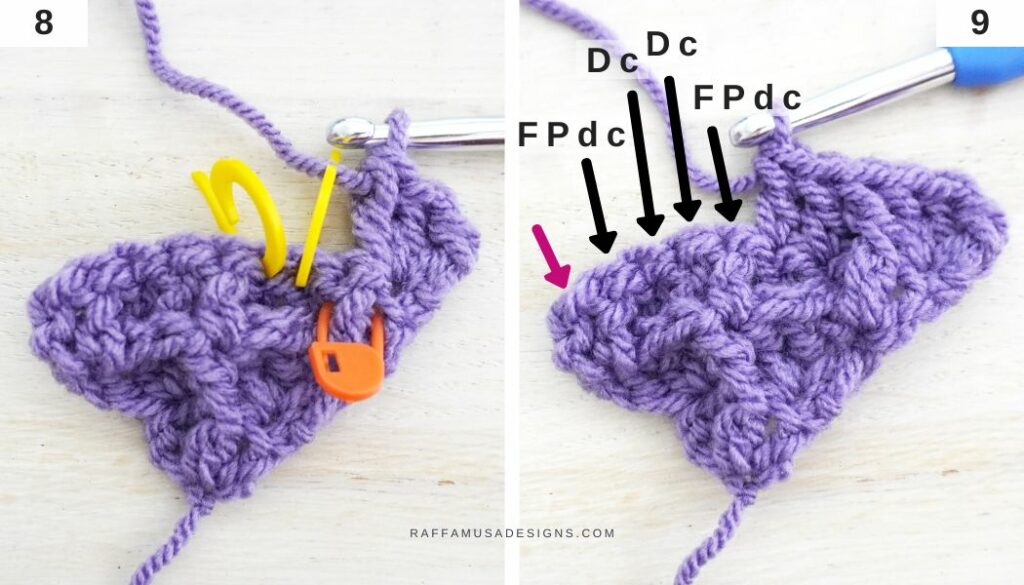
FPdc 1, [dc 3] in last st (see the pink arrow in photo 9). (you will increase by 2 sts on each side for a total of 4 sts per row)
Row 5 (WS)
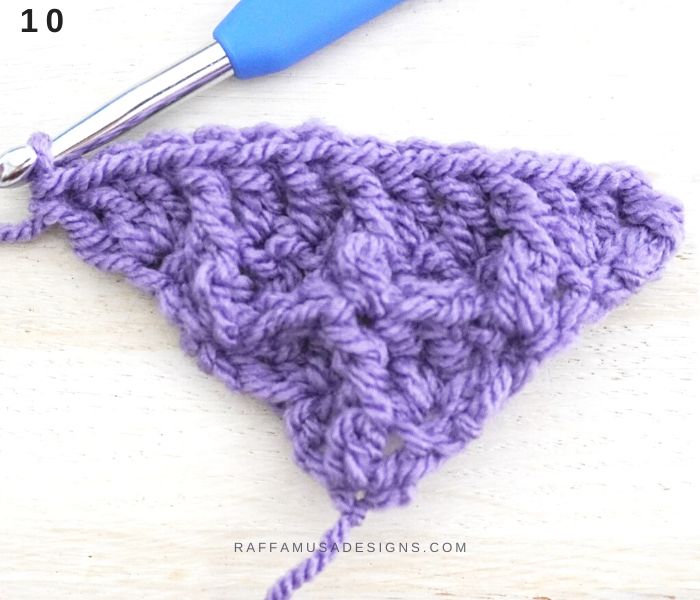
Turn, [ch-less dc 1, dc 1] in first st, *FPdc 2, dc 1. Repeat from * until you have 3 sts left. FPdc 2, [dc 2] in last st (photos 11-12). (you will increase 1 st on each side for a total of 2 sts per row)

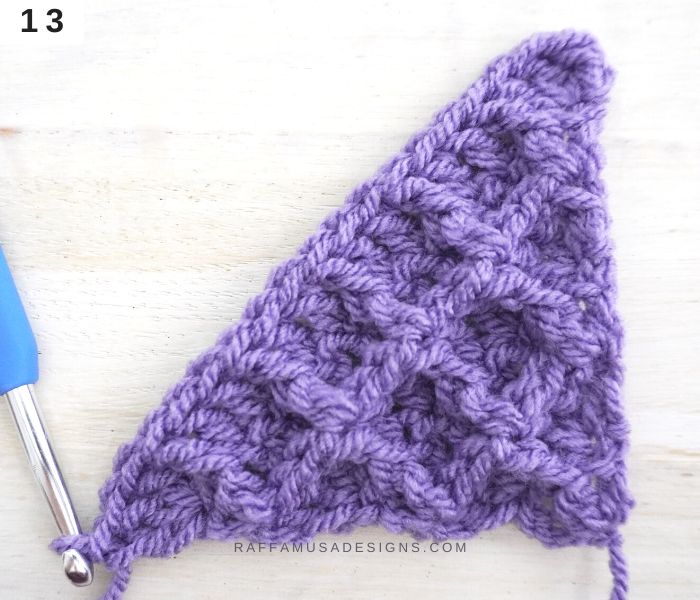
Repeat rows 4 and 5 to grow your work (photo 13).
Decreases
You can start decreasing on either the RS or WS of the work.
Here, I’ll give you the general rule for decreasing on either side and I’ll call the rows “Row X” for the RS and “Row Y” for the WS.
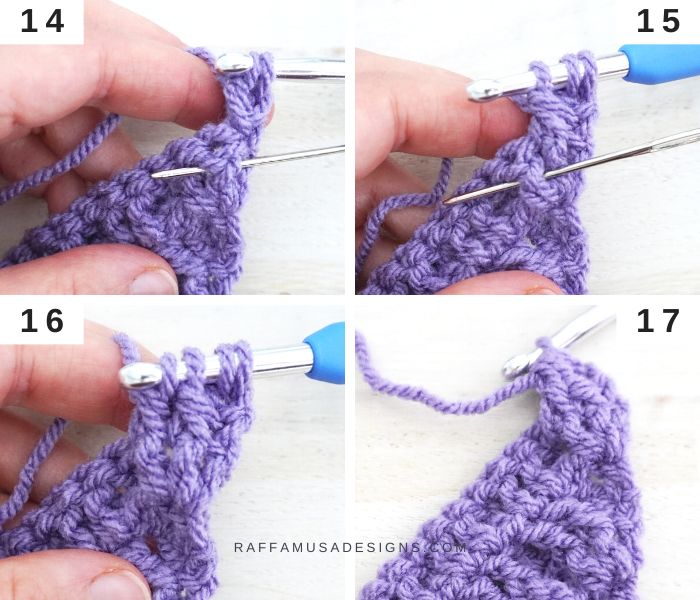
Decrease Row on the WS (Row Y)
Ch 1 (does not count as a st here and throughout), turn. Dc/2FPdc3tog as follows:
- Yo, insert your hook in the first st, yo, and pull up a loop, yo, pull through two loops (2 loops on your hook, photo 14);
- Yo, insert your hook under the post of the next st (indicated by the needle in photo 14), yo, pull up a loop, yo, pull through two loops (3 loops on your hook, photo 15);
- Yo, insert your hook under the post of the next st (indicated by the needle in photo 15), yo, pull up a loop, yo, pull through two loops (4 loops on your hook, photo 16);
- Yo, pull through all four loops on your hook (photo 17).
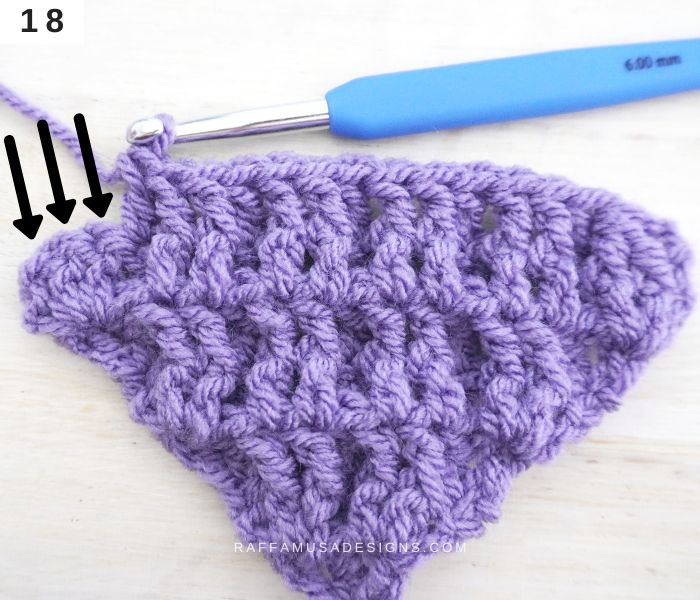
*Dc 1, FPdc 2. Repeat from * until you have 4 sts left. Dc 1 in the next st (photo 18).
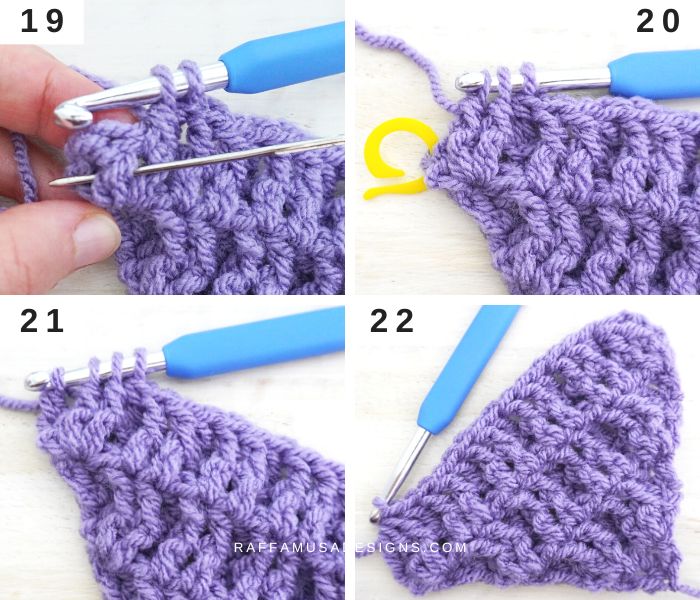
Then, 2FPdc/dc3tog as follows:
- Yo, insert your hook under the post of the next st, yo, pull up a loop, yo, pull through two loops (2 loops on your hook, photo 19);
- Yo, insert your hook under the post of the next st (indicated by the needle in photo 19), yo, pull up a loop, yo, pull through two loops (3 loops on your hook, photo 20);
- Yo, insert your hook in the last st (marked by the yellow st marker in photo 20), yo, pull up a loop, yo, pull through two loops (4 loops on your hook, photo 21);
- Yo, pull through all four loops on your hook (photo 22).
(you will decrease 2 sts per side for a total of 4 sts per row)
Decrease Row on the RS (Row X)
Ch 1 (does not count as a st here and throughout), turn. Dc/FPdc2tog as follows:
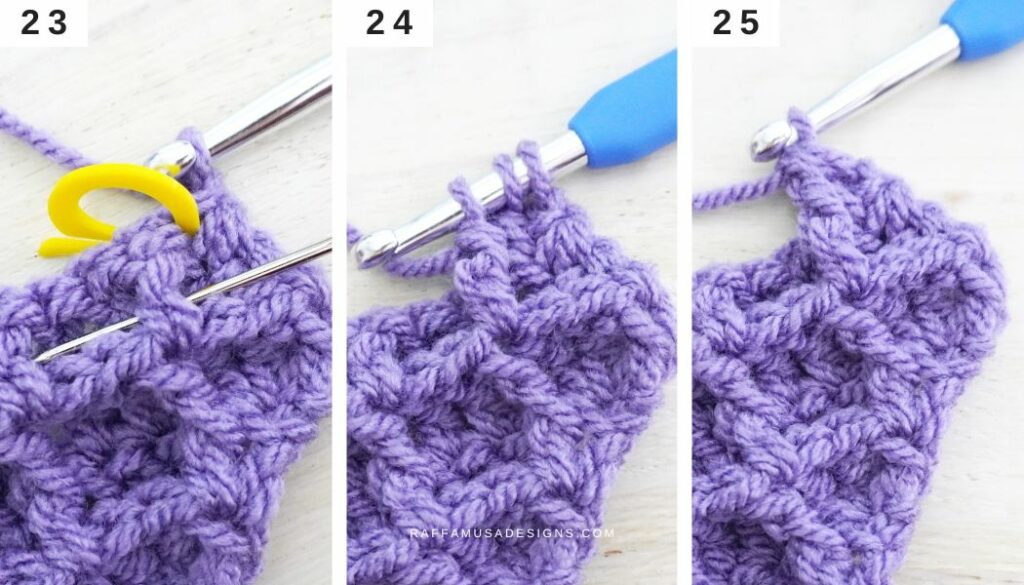
- Yo, insert your hook in the first st (marked by the yellow st marker in photo 23), yo, pull up a loop, yo, pull through two loops (2 loops on your hook);
- Yo, insert your hook under the post of the next st (indicated by the needle in photo 23), yo, pull up a loop, yo, pull through two loops (3 loops on your hook, photo 24);
- Yo, pull through all three loops on your hook (photo 25).
*Dc 2, FPdc 1. Repeat from * until you have 4 sts left. Dc 2.
Then, FPdc/dc2tog as follows:
- Yo, insert your hook under the post of the next st (indicated by the needle in photo 26), yo, pull up a loop, yo, pull through two loops (2 loops on your hook);
- Yo, insert your hook in the last st (marked by the yellow st marker in photo 26), yo, pull up a loop, yo, pull through two loops (3 loops on your hook);
- Yo, pull through all three loops on your hook (photo 27).

(you will decrease 1 st on each side for a total of 2 sts per row)
Repeat rows Y and X to decrease your work.
When you get to the second-to-last row, you should have 3 sts.
Last Row (RS)
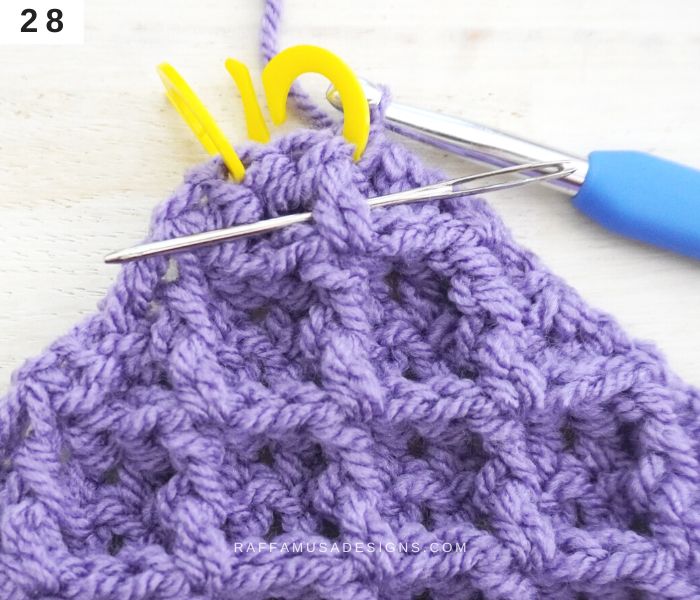
Dc/FPdc/dc3tog as follows:
- Yo, insert your hook in the first st (marked by the yellow st marker on the right in photo 28), yo, pull up a loop, yo, pull through two loops (2 loops on your hook);
- Yo, insert your hook under the post of the next st (indicated by the needle in photo 28), yo, pull up a loop, yo, pull through two loops (3 loops on your hook);
- Yo, insert your hook in the last st (marked by the yellow st marker on the left in photo 28), yo, pull up a loop, yo, pull through two loops (4 loops on your hook);
- Yo, pull through all four loops on your hook.
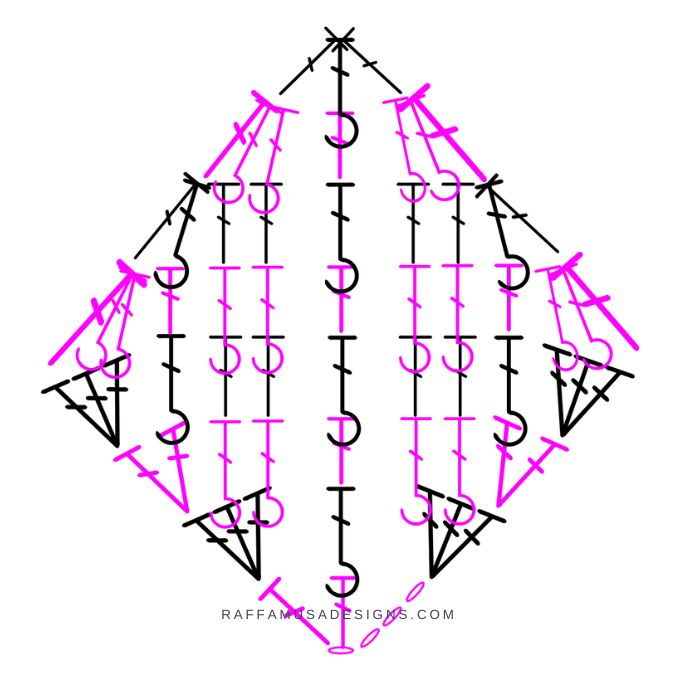
Crochet C2C Waffle Stitch – Stitch Chart
I hope you enjoyed this step-by-step tutorial on how to crochet the C2C Waffle Stitch!
I’m looking forward to seeing your creations using this stitch. Please, share a pic of your work on Facebook and Instagram using the hashtag #raffamusadesigns!
Find more crochet stitch tutorials here on the blog…