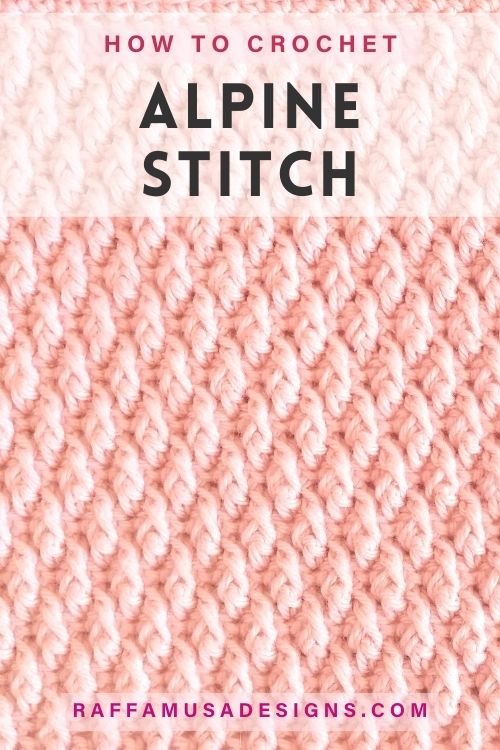
The crochet Alpine Stitch is one of those textured stitches with a romantic and rustic look, just what you’d expect for your handmade creations.
WHAT TO CROCHET WITH THE Alpine STITCH
The alpine stitch creates a solid and warm fabric that is ideal for many projects, especially for Fall and Winter. Here are a few ideas.
- The alpine stitch is just gorgeous for blankets!
- Scarves, hats, and other fall/winter accessories will be super warm, soft, and cozy with the alpine stitch;
- Dishcloths, washcloths, and potholders;
- Baskets and other home decor items.
The alpine stitch is very easy and it is a simple repeat of 4 rows, two of which are simple crochet rows.
However, for the rows that are not single crochet ones, you will need to crochet drop front post double crochet stitches.
If you’re not familiar with crocheting front post stitches, I suggest you take a look at this tutorial HERE where I show you in great detail how to make front and back post stitches in crochet.
One little extra challenge in the alpine stitch is that the front post double crochet stitches are worked in the corresponding stitch two rows below. Thus, explaining the “drop” I mentioned earlier.
But no worries, it is nothing too difficult. Especially because you always work the drop front post stitches into the previous dc row, just ignoring the single crochet row in between them! So, easy-peasy…
In this step-by-step tutorial, I’ll guide you on how to crochet the alpine stitch. At the bottom of this post (just scroll all the way down), you’ll also find the pattern chart.
Find more beautiful stitches to crochet!
Note: this post contains affiliate links. This means that if you purchase something through the links on my blog, I might earn a commission. This will not have any effect on the price you pay. For more info, please, see my Privacy Policy.
How to Fix the Edge of the Alpine Stitch
Before we start, I would like to add a little note about fixing wonky edges when crocheting the alpine stitch.
Most tutorials start and end all dc rows with a dc, as you would expect for a dc row.
However, I find that replacing the first and last st of each dc row with a half double crochet fixes the wonky-edges problem. Even without blocking, you’ll get straight and beautiful sides!
So, in this pattern tutorial, we will be using half double crochet stitches at the beginning of double crochet rows.
Feel free to use double crochet instead if you find it works best for your tension.
MATERIALS
- Yarn of choice. For this tutorial, I used Paintbox Cotton DK.
- Appropriate hook. Here, I used a 3.5-mm (E/4 US, 9 UK) crochet hook.
ABBREVIATIONS (US TERMS)
- Ch – Chain
- FPdc – Front Post Double Crochet
- Hdc – Half Double Crochet
- Sc – Single Crochet
- Sk – Skip
- Sl St – Slip Stitch
- St – Stitch
- Yo – Yarn Over
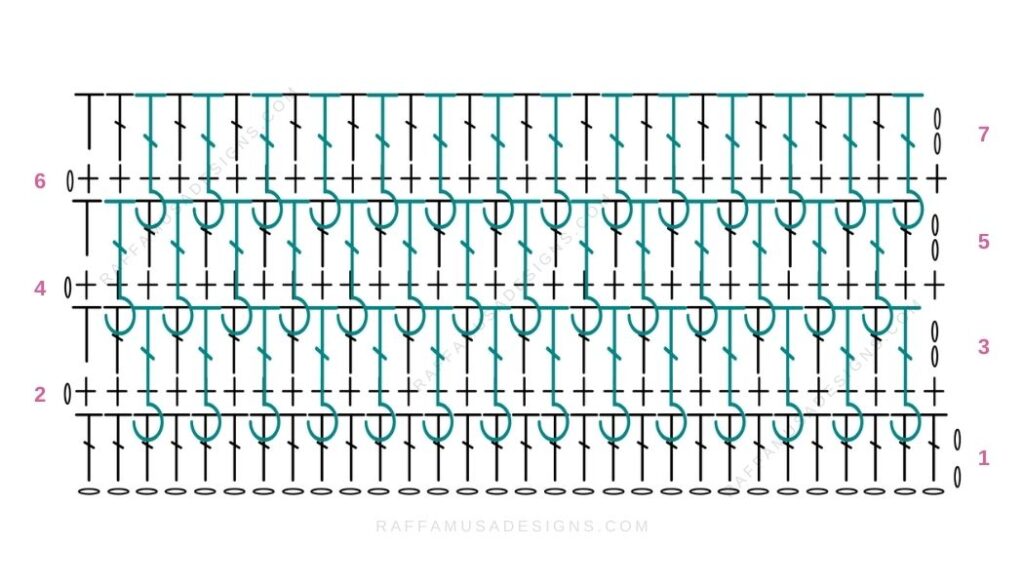
CROCHET Alpine STITCH – FREE TUTORIAL
Ch a multiple of 2 + 2 for turning.
For this tutorial, I made 30 chains + 2 = 32 chains. So, throughout my swatch, I will have 30 sts.
Note that you can also crochet the alpine stitch with an odd number of stitches! However, the instructions below will work for even numbers. Once you learn how to crochet the alpine stitch, you’ll be able to adapt the pattern for any stitch count.
Row 1. Dc across starting from the third ch from your hook.
Row 2. Ch 1 (does not count as a st), turn. Sc across.
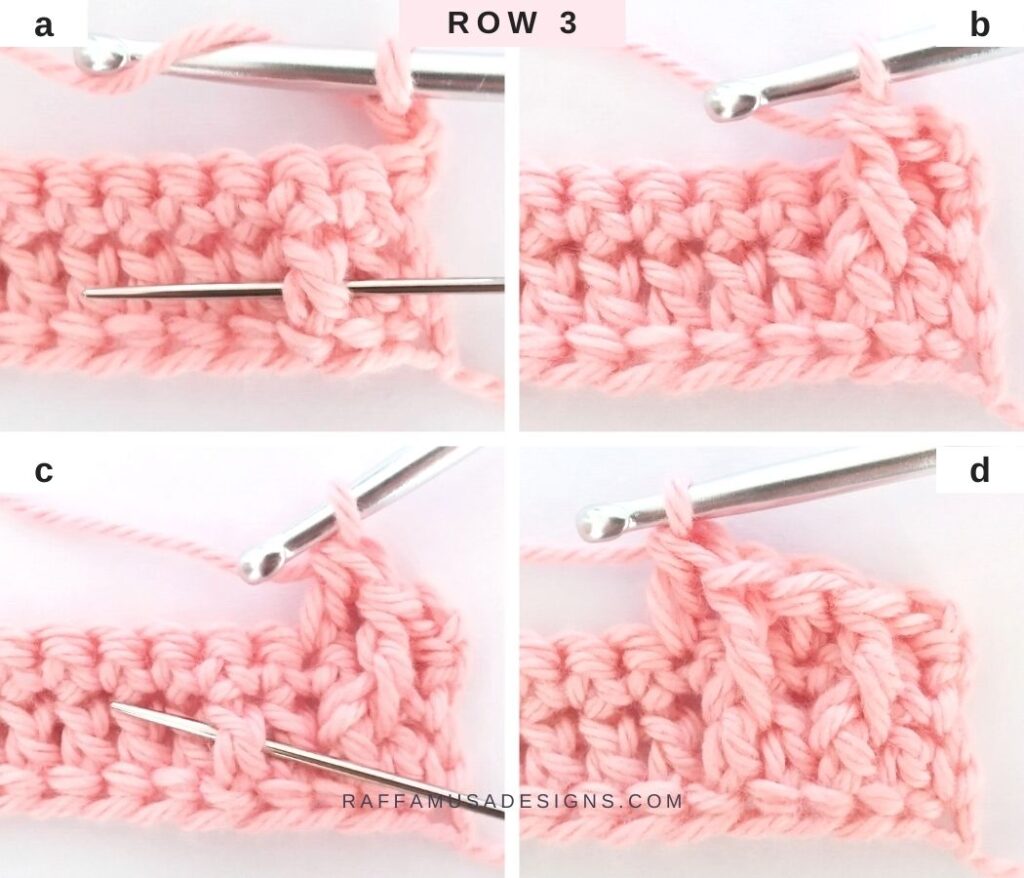
Row 3
Ch 2 (counts as your first hdc) and turn. *FPdc 1 in corresponding st two rows below, dc 1. Repeat from * until you have 1 st left. Hdc in last st.
Step-by-Step Walkthrough – Row 3
- Step 1. Ch 2, turn and identify the second st on row 1 (indicated by the needle in picture a).
- Step 2. FPdc around the second st of row 1.
- Step 3. Dc 1 in next st on row 2 (picture c). Notice that you sk the st from row 2 that is behind the FPdc you did in step 2!
- Step 4. Sk 1 st on row 1 and FPdc around next st (indicated by the needle in picture c), dc 1 in next st on row 2 (picture d).
- Step 5. Repeat step 4 until you have 1 st left.
- Step 6. Hdc in last st.
Row 4. Ch 1 (does not count as a st), turn. Sc across.
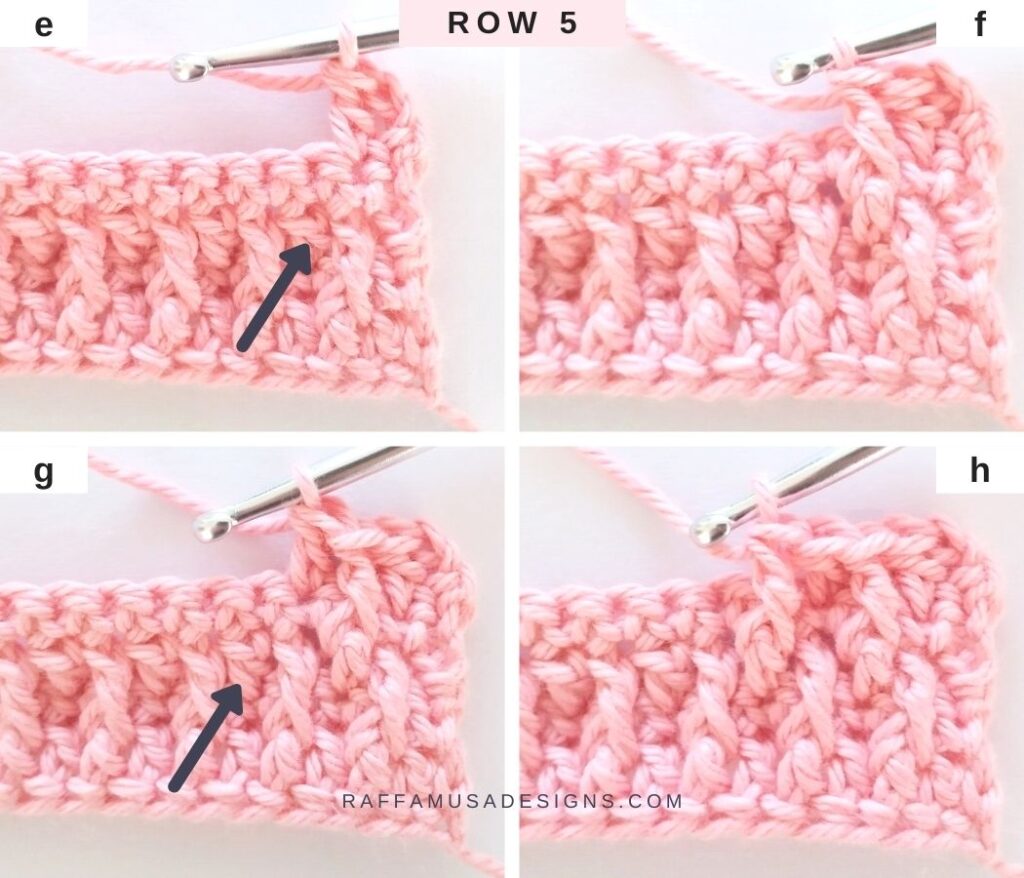
Row 5
Ch 2 (counts as your first hdc) and turn. *Dc 1, FPdc 1 in corresponding st two rows below. Repeat from * until you have 1 st left. Hdc in last st.
Step-by-Step Walkthrough – Row 5
- Step 1. Ch 2, turn and dc 1 in second st from previous row (picture e).
- Step 2. Identify the first dc between 2 FPdc sts on row 3 (indicated by the arrow in picture e). FPdc around the st you just identified (picture f).
- Step 3. Dc 1 in next st on row 4. Notice that you need to sk the st from row 4 that is behind the FPdc you did in step 2!
- Step 4. Sk next FPdc on row 3 and FPdc around next st (indicated by the arrow in the picture g).
- Step 5. Repeat steps 3 and 4 until you have 1 st left. Notice that the last FPdc of this row goes into the semi-last st of row 3.
- Step 6. Hdc in last st.
To grow your project, keep repeating the same pattern as for rows 2-5.
Crochet Alpine Stitch – Pattern Chart
You just learned to crochet the Alpine Stitch!
Find more crochet stitch tutorials here on the blog…
How can I estimate the amount of worsted medium weight wool needed for a men’s scarf using the alpine stitch? Thank you for this wonderful information and blog.
Hi Julia, the easiest way to estimate the amount of yarn needed is to make a small swatch of 4″ (10 cm) by 4″. Count the number of stitches and rows in your swatch and decide how many stitches and rows you want your scarf to be. When you’re done:
– if you have a precision scale, simply weigh your swatch. Then, divide the weight of your swatch by the number of stitches in your swatch and multiply the result for the number of stitches of your scarf. That will give you the oz/g of yarn for the entire scarf.
– if you don’t have a precision scale, frog (undo) your swatch and measure the yds/m that you used to make it. Divide that number by the number of stitches in your swatch and multiply the result for the number of stitches in your scarf. The result is the yardage of your scarf.
I hope this helps 🙂
Best,
Raffaella
Thank you for being so charitable with your patterns.