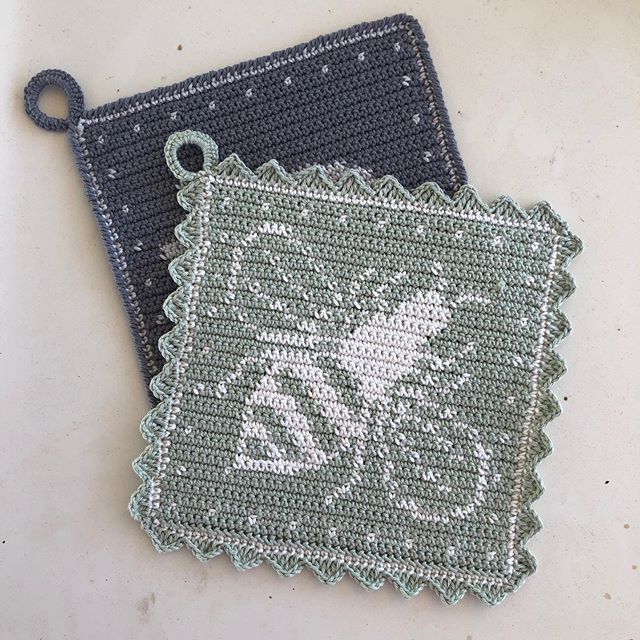
Today, I am so happy to share with you my Tapestry Crochet Bee Potholder.

I have put much thought and effort into this design as I came to realize that it is not easy to draw a beehive in just 45 pixels. So, my beehive slowly became just one bee and I couldn’t be happier about it.
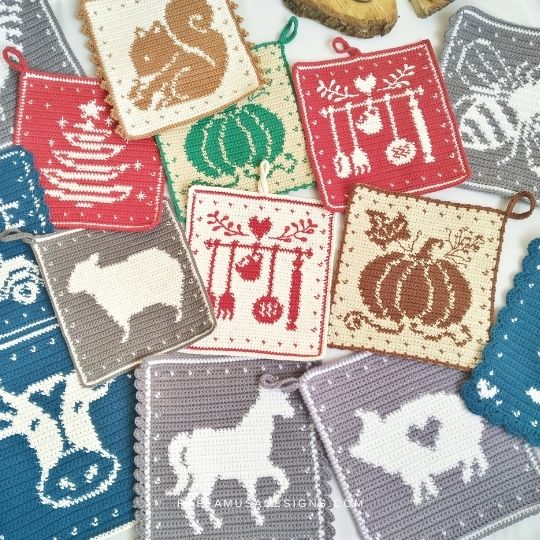
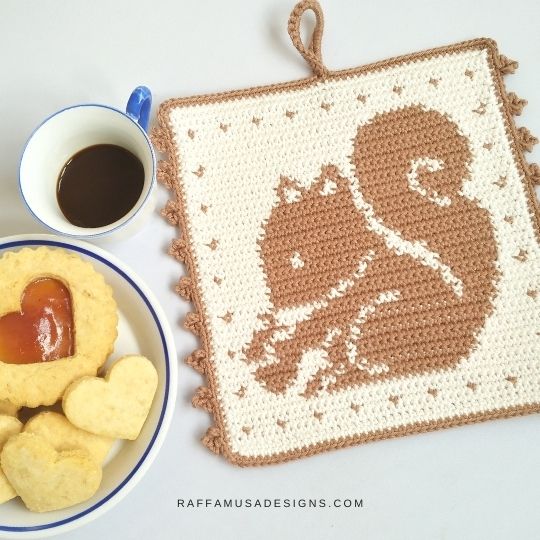
FARMHOUSE COLLECTION
The Bee Potholder is part of my Farmhouse Collection, which includes farm- and farm animals-inspired patterns for solid and sturdy hot pads.
The collection started with the Rooster Potholder, and it slowly grew to include the goose, the cow, the pig, and many others.
Make sure to check all the designs included in the Farmhouse Collection HERE!

Thank you to my Testers, Jorie and Bonnie!
Writing up the pattern and making sure that it makes sense is not as easy as it sounds. This is why it is important to have someone check that everything looks ok.
I was lucky enough to have Jorie and Bonnie test my pattern, and I would like to thank them both!
Tap on the image and give some love to Jorie’s Bee Potholder!

Add the pattern of the Bee Potholder to your Ravelry queue HERE (and favorite the pattern, please!). Or save it for later by pinning it to your best crochet board on Pinterest using this pin.

Note: this post contains affiliate links. This means that if you purchase something through the links on my blog, I might earn a commission. This will not have any effect on the price you pay. For more info, please, see my Privacy Policy.
AD-FREE DOWNLOADABLE PATTERN
I know ads are annoying… But no worries! The crochet pattern of the Bee Potholder is available as an ad-free PDF in my Ravelry, LoveCrafts, and Etsy stores!


MATERIALS
- 3.0-mm (C-2 USA, 11 UK) Crochet Hook
- Paintbox Yarns Cotton DK in two contrasting colors (A and B).
- Tapestry Needle
YARDAGE
- A – 62 yds (56 m)
- B – 39 yds (35 m)
SIZE
The finished potholder measures 6.7” (17 cm) by 7.3” (18.5 cm)
GAUGE
28 sc for 26 rows in 4” (10 cm) worked in tapestry crochet.
Crochet abbreviations (US Terms)
Ch – Chain
Dc – Double Crochet
Hdc – Half Double Crochet
RS – Right Side
Sc – Single Crochet
Sk – Skip
Sl St – Slip Stitch
St – Stitch
Tr – Treble Crochet
Yo – Yarn Over
WS – Wrong Side
TAPESTRY CROCHET
This potholder is worked using tapestry crochet.
If you’re new to this technique, make sure to check these blog posts:
- Read all about tapestry crochet in this guide HERE;
- Learn how to make invisible color changes both on the right and wrong sides HERE.
Or watch the video tutorial on how to crochet the potholders of the Farmhouse Collection on my YouTube channel HERE.
PATTERN NOTES
- The pattern is written in two sections. The Potholder is worked in rows, then the Border is worked in rounds.
- The potholder is worked entirely in sc.
- If the pattern says “(A) 5”, it means that with color A, you need to make one single crochet in each of the next 5 stitches.
- Turn your work at the end of each row.
- The starting ch 1 counts as your first stitch and is always made with A.
- All odd-numbered rows are crocheted on the right side. All even-numbered rows are crocheted on the wrong side.
- (…) – Repeat the instructions within brackets for the indicated number of times.
- With the exception of the border, the stitch count is always 45 sts.
Tapestry Crochet Bee Potholder – Pattern
(A) Ch 46.
← Row 1 [RS]. (A) Sc in second ch from hook and in each ch across. (45 sts).
→ Row 2 [WS]. (A) 45.
← Row 3 [RS]. (A) 2, (B) 1, ((A) 4, (B) 1) 8 times, (A) 2.
→ Row 4 [WS]. (A) 45.
← Row 5 [RS]. (A) 45.
→ Row 6 [WS]. (A) 45.
← Row 7 [RS]. (A) 8, (B) 5, (A) 10, (B) 1, (A) 21.
→ Row 8 [WS]. (A) 2, (B) 1, (A) 19, (B) 1, (A) 7, (B) 3, (A) 4, (B) 2, (A) 3, (B) 1, (A) 2.
← Row 9 [RS]. (A) 5, (B) 1, (A) 9, (B) 1, (A) 5, (B) 1, (A) 14, (B) 1, (A) 8.
→ Row 10 [WS]. (A) 9, (B) 8, (A) 7, (B) 1, (A) 4, (B) 1, (A) 10, (B) 1, (A) 4.
← Row 11 [RS]. (A) 4, (B) 1, (A) 3, (B) 2, (A) 6, (B) 1, (A) 3, (B) 1, (A) 4, (B) 6, (A) 3, (B) 2, (A) 9.
→ Row 12 [WS]. (A) 9, (B) 1, (A) 3, (B) 2, (A) 3, (B) 3, (A) 3, (B) 1, (A) 3, (B) 1, (A) 4, (B) 2, (A) 5, (B) 1, (A) 4.
← Row 13 [RS]. (A) 2, (B) 1, (A) 1, (B) 1, (A) 7, (B) 1, ((A) 3, (B) 1) twice, (A) 2, (B) 1, (A) 1, (B) 3, (A) 3, (B) 2, (A) 2, (B) 1, (A) 6, (B) 1, (A) 2.
→ Row 14 [WS]. (A) 9, (B) 1, (A) 1, (B) 2, (A) 3, (B) 3, (A) 3, (B) 1, (A) 1, (B) 1, (A) 2, (B) 1, (A) 3, (B) 1, (A) 8, (B) 1, (A) 4.
← Row 15 [RS]. (A) 4, (B) 1, (A) 2, (B) 2, (A) 5, (B) 1, ((A) 2, (B) 1) twice, (A) 1, (B) 1, (A) 4, (B) 3, (A) 3, (B) 3, (A) 9.
→ Row 16 [WS]. (A) 9, (B) 1, (A) 4, (B) 4, (A) 3, (B) 4, (A) 1, (B) 1, (A) 2, (B) 1, (A) 5, (B) 1, (A) 3, (B) 2, (A) 4.
← Row 17 [RS]. (A) 5, (B) 1, (A) 4, (B) 1, (A) 5, ((B) 1, (A) 1) twice, (B) 5, (A) 3, (B) 4, (A) 3, (B) 1, (A) 9.
→ Row 18 [WS]. ((A) 2, (B) 1) twice, (A) 3, (B) 7, (A) 3, (B) 4, ((A) 1, (B) 1) 3 times (A) 3, (B) 2, (A) 4, (B) 1, (A) 3, (B) 1, (A) 2.
← Row 19 [RS]. (A) 7, (B) 2, (A) 4, (B) 3, (A) 1, (B) 2, (A) 1, (B) 1, (A) 2, (B) 4, (A) 3, (B) 5, (A) 4, (B) 1, (A) 5.
→ Row 20 [WS]. (A) 6, (B) 1, (A) 3, (B) 3, (A) 4, (B) 4, (A) 3, (B) 3, (A) 1, (B) 2, (A) 4, (B) 2, (A) 9.
← Row 21 [RS]. (A) 11, (B) 3, (A) 3, (B) 5, (A) 3, (B) 4, (A) 4, (B) 1, (A) 3, (B) 1, (A) 7.
→ Row 22 [WS]. (A) 7, (B) 1, (A) 3, (B) 2, (A) 1, (B) 5, (A) 4, (B) 4, (A) 1, (B) 4, (A) 13.
← Row 23 [RS]. (A) 2, (B) 1, (A) 7, (B) 2, (A) 5, (B) 6, (A) 4, (B) 6, (A) 1, (B) 3, (A) 5, (B) 1, (A) 2.
→ Row 24 [WS]. (A) 10, (B) 7, (A) 3, (B) 9, (A) 2, (B) 2, (A) 2, (B) 1, (A) 9.
← Row 25 [RS]. (A) 8, (B) 1, (A) 5, (B) 14, (A) 17.
→ Row 26 [WS]. (A) 9, (B) 8, (A) 3, (B) 10, (A) 2, (B) 2, (A) 11.
← Row 27 [RS]. (A) 10, (B) 1, (A) 1, (B) 17, (A) 7, (B) 2, (A) 7.
→ Row 28 [WS]. (A) 2, (B) 1, (A) 3, (B) 1, (A) 7, (B) 3, (A) 4, (B) 9, (A) 5, (B) 1, (A) 6, (B) 1, (A) 2.
← Row 29 [RS]. (A) 8, (B) 1, (A) 5, (B) 9, ((A) 1, (B) 1) twice, (A) 4, (B) 2, (A) 6, (B) 1, (A) 5.
→ Row 30 [WS]. (A) 4, (B) 1, (A) 5, (B) 2, (A) 4, (B) 2, (A) 2, (B) 1, (A) 2, (B) 9, (A) 13.
← Row 31 [RS]. (A) 12, (B) 7, ((A) 1, (B) 1) twice, (A) 2, (B) 1, (A) 3, (B) 1, (A) 5, (B) 2, (A) 3, (B) 1, (A) 4.
→ Row 32 [WS]. (A) 4, (B) 1, (A) 2, (B) 1, (A) 6, (B) 1, (A) 3, ((B) 1, (A) 2) twice, (B) 1, (A) 1, (B) 7, (A) 12.
← Row 33 [RS]. (A) 2, (B) 1, (A) 9, (B) 6, (A) 2, (B) 2, (A) 2, (B) 1, (A) 1, (B) 1, (A) 4, (B) 2, (A) 5, ((B) 1, (A) 1) twice, (B) 1, (A) 2.
→ Row 34 [WS]. (A) 4, (B) 1, (A) 6, (B) 1, (A) 5, (B) 1, ((A) 2, (B) 1) twice, (A) 4, (B) 4, (A) 1, (B) 1, (A) 11.
← Row 35 [RS]. (A) 7, (B) 4, (A) 3, (B) 1, (A) 5, (B) 1, ((A) 3, (B) 1) twice, ((A) 5, (B) 1) twice, (A) 4.
→ Row 36 [WS]. ((A) 4, (B) 1) twice, ((A) 5, (B) 1) twice, (A) 3, (B) 1, (A) 5, (B) 1, (A) 13.
← Row 37 [RS]. (A) 13, (B) 1, (A) 4, (B) 1, (A) 3, (B) 1, (A) 7, (B) 1, (A) 5, (B) 1, (A) 3, (B) 1, (A) 4.
→ Row 38 [WS]. ((A) 2, (B) 1) twice, (A) 7, (B) 1, (A) 16, (B) 1, (A) 11, (B) 1, (A) 2.
← Row 39 [RS]. (A) 14, (B) 1, (A) 17, (B) 2, (A) 4, (B) 1, (A) 6.
→ Row 40 [WS]. (A) 7, (B) 4, (A) 34.
← Row 41 [RS]. (A) 45.
→ Row 42 [WS]. (A) 45.
← Row 43 [RS]. (A) 2, (B) 1, ((A) 4, (B) 1) 8 times, (A) 2.
→ Row 44 [WS]. (A) 45.
← Row 45 [RS]. (A) 45.

Border
After row 45, both A and B are at the left, top corner of your potholder (if you are right-handed, or the right corner if you are left-handed).
Round 1 (RS). With B, sc 45 on each side of the potholder starting from the left side, then the bottom, right side, and top. At the corners, sc 1 in the last st of the side, ch 1, and sc 1 in the first st of the next side. Join the round with a sl st into the first st. (45 sts on each side and 1 ch at the corners).
Round 2 (RS). With A, ch 1. (Sc 1, hdc 1, dc 1, tr 1, ch 3 and sl st into the next st) 9 times. At the corner, [sc, ch 1, sc] all in the ch-1 from the previous round. Sc 45, work the corner as the previous one, (sc 1, hdc 1, dc 1, tr 1, ch 3 and sl st into the next st) 9 times.
Hanging Loop
Sl st into next ch-1 corner space, ch 20, sl st into the same ch-1 corner. Ch 1, sc 25 inside of the loop, sl st into the same corner space.
Sc 45 on the top side of the potholder. At the corner, [sc, ch 1, sc] all in the ch-1 from the previous round.
Join the round with a sl st in the first sc.
Fasten off, weave in ends.
Your Tapestry Crochet Bee Potholder is ready!
I hope you enjoyed crocheting this pattern. Please, do not hesitate to contact me if you need any help or support. I am looking forward to seeing all your beautiful makes on Facebook and Instagram!
Find more kitchen decor ideas here on the blog…

This is so cute! All the other potholders are so adorable too!
Thank you so much! 🙂
Thank you for the beautiful and functional patterns. May I make these and sell at a fundraiser? I think they would be wonderful at our quilt show and at my PEO fundraiser. Thank you again.
Hi Athena,
If you mean that you’d like to take your finished potholders to sell, feel free!
Of course, you’re not allowed to sell the patterns but feel free to include the link to them in your tags 🙂
Have a nice day,
Raffaella
Hi, you say the count is always 45 but on rounds 4-6 you say crochet 44 sc.
Hi Sue,
that’s because I consider the first ch-1 as my first st. So, in the next row, I ch 1, turn, sk the first st, and then sc 44 (the 44th st goes in the beginning ch-1 from the previous row!).
I should make this info more explicit I guess. For now, there is just a line in the Pattern Notes where I say that the initial ch 1 counts as a st…
Anyhow, if you prefer, you can still ch 1 and work 45 sts, without counting the initial ch-1 as a st. In this case, just add 1 st to the first block of sts at the beginning of each row and you’re good to go!
I also have a video tutorial where I show the way I crochet these potholders. You can find it here:
https://www.youtube.com/watch?v=qJzEcXuW3VM&t
Let me know if you have any questions 🙂
Best,
Raffaella
I have started and restarted this 4 different times now and nothing ends up adding up. My pattern doesn’t line up, stitches don’t add up. I’m putting my hook in exactly where you are. I’m afraid I’ll have to just give up.
Hi Mary, I’m sorry this pattern is getting you so frustrated. Did you try watching the video tutorial? Maybe that can help a bit… Or you could send me a pic of your work so I can try and help you.
Nicely done and very popular topic!