Today, I wanted to take a minute to talk a little about the anatomy of basic crochet stitches.
And hopefully help you understand how a crochet stitch is made, what are all the parts, loops, and legs that go into making a stitch!
When you’re just starting out, you really want to learn to chain and stitch something. You’re probably not ready to understand every single bit of what’s going on.
However, with time and practice, your crochet stitches and the movements that go into creating them become more familiar, maybe somehow automatic, but you also start looking at things in a clearer way.
If you are at this point in your crochet journey, then it is time to dive into some terminology and understand the ins and outs of a crochet stitch.
The other option of course is that you’re desperately trying to understand what the pattern writer meant with crochet around the post of the next stitch, or crochet in the back loop only, etc… I know, that can sound like a foreign language!
So, stay with me, maybe grab some yarn and a hook so that you can make some swatches as you read and try to understand things better with some real stitches in front of you.
The main parts of all basic crochet stitches are the top of the stitch and the post.
The top of a Stitch
The top of the stitch is made of the two loops that sit right at the top of your work, forming a sort of V.
The nice part of the top of the stitch is that it looks the same for all the basic stitches.
When a pattern says to crochet into the next stitch, that means that you need to make your stitch by inserting your hook under both loops of the next stitch.
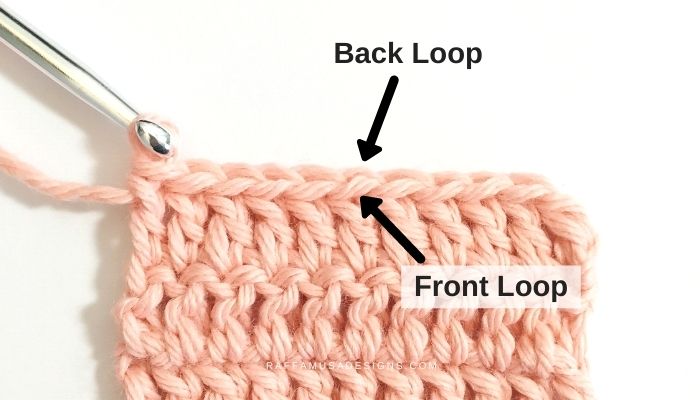
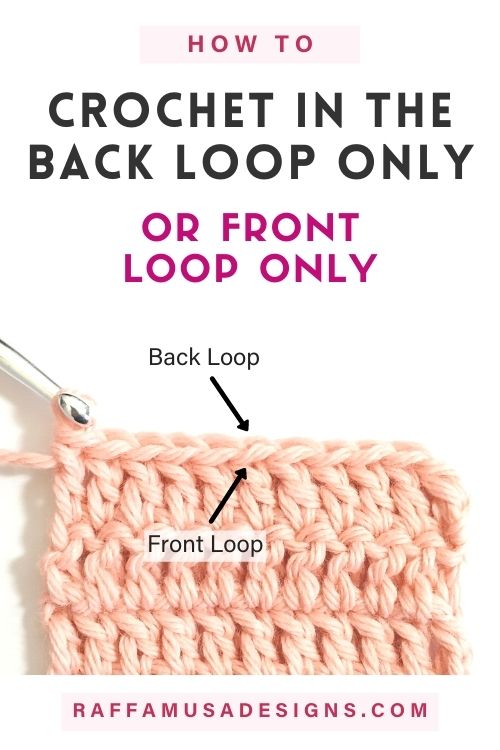
However, you might also find patterns that call for a front loop only (FLO) or back loop only (BLO) stitch. That means that you’ll need to crochet only into one of the top loops of the next stitch, either the front one or the back one!
The front loop of a stitch is the top loop that is the closest to you, so it is in front. On the other hand, the back loop is the one that is further away from you, on the back of your work.
If you would like a more detailed guide, I have a complete tutorial on how to crochet in the front or back loop only here.
What is the Post of a Crochet Stitch
One of the first things that you learn when you start crocheting is that a single crochet stitch definitely looks different than a double crochet one, and it is also shorter.
What makes each stitch unique is the post of the stitch. The post of the stitch is its body, or in other words, its height.
One common way to use the post to create beautiful textures is to crochet stitches wrapped around the post. This means that the stitch is not crocheted into the top loops. Instead, you wrap your hook around the post, either from front to back for front post stitches, or from back to front for back post stitches.
To help you understand how to crochet around the post of crochet stitches, I created a more detailed tutorial on front/back post stitches here.
But before you go and read that, let’s take a look at each basic stitch one at a time. I’ll just skip the slip stitch, which doesn’t have a post at all, and I’ll start with the single crochet.
Single Crochet
The post of a single crochet looks like a V.

Since it is so short and packed, it is uncommon to crochet stitches wrapped around the post of a single crochet.
However, it is still possible to use the post of a single crochet stitch to create an alternative look to the classic single crochet.
I am talking about the knit stitch, also called center single crochet stitch, waistcoat stitch, or split single crochet stitch. The knit stitch is a single crochet stitch made by inserting the hook between the two legs of the V-shaped post.
You can see an example of the knit stitch in action in my Sea Waves Basket.
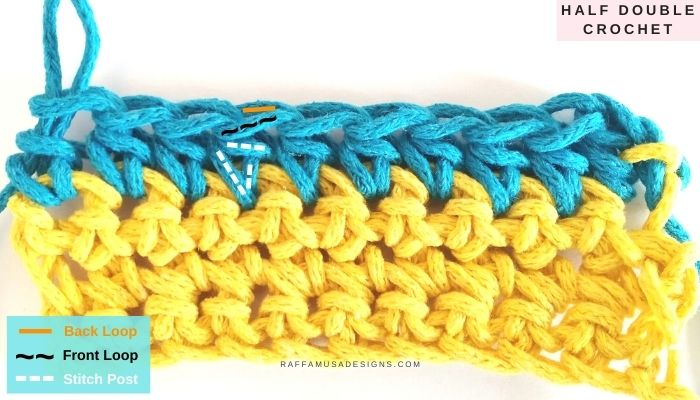
Half Double Crochet
The post of a half double crochet stitch is slightly taller than the one of a single crochet stitch. The reason for the extra height is the “yarn over” that you do at the beginning.
Front and post stitches are definitely possible with the half double crochet. They are great for creating ribbings and interesting textures.
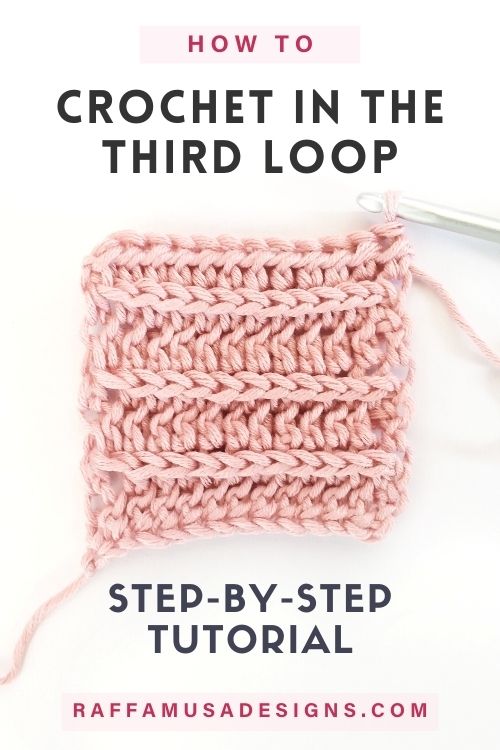
Where is the Third Loop on a Half Double Crochet Stitch?
But there is more! That yarn over right at the beginning of the stitch not only makes the post of the stitch taller. It also creates an extra loop on the back of the stitch, which is called the third loop.
Crocheting in the third loop is a beautiful way to add texture to a pattern. You can learn all about crochet in the third loop in this step-by-step tutorial.
Double Crochet
In a double crochet stitch, the post is characterized by two V’s with a horizontal bar right in the middle of the post. That bar comes from the yarn over that you do at the beginning of the stitch in combination with the two (yarn over, pull through two) to complete it.
I know that in the picture below it might look like there are two horizontal bars but it is actually one. The right horizontal bar is the lower one. The one on top is actually one leg of the top V of the stitch. To convince yourself of what I am saying, please, take a look at the double crochet stitch that is the closest to my fingers. There, you can clearly see the top V above the horizontal bar.
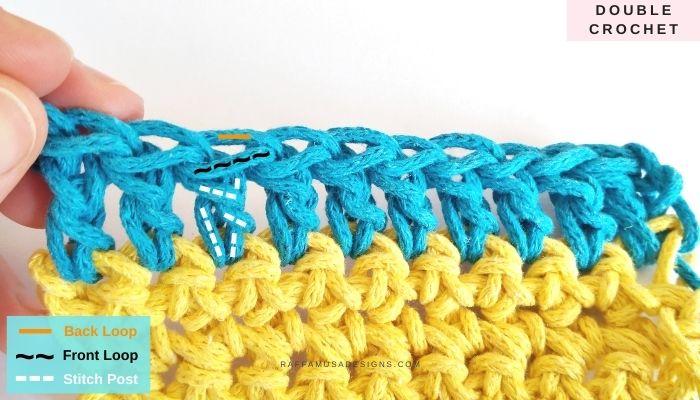
The two (yarn over, pull through two) are the reason why that horizontal bar is present in a double crochet and not in a half double crochet, where you pull through all loops at once!
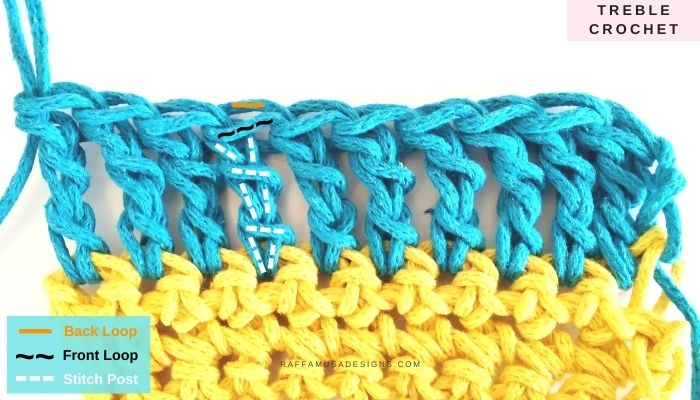
Treble Crochet
The post of a treble crochet stitch is the tallest of the basic stitches. You can recognize it thanks to three V’s and two horizontal bars.
If you understood why a double crochet stitch has one horizontal bar on its post, then you can guess why a treble crochet has two of them. Those two bars come from the two yarn overs that you do in preparation for a treble stitch.
Of course, you can create even taller posts with the double treble crochet and even taller stitches than that. But once you learn to recognize the post of the basic stitches, you’re prepared for all the other less common stitches too.
Right Side vs Wrong Side
At this point, it might be useful to look at all the basic crochet stitches next to each other. This way, it is easier to compare their posts.
Plus, it is finally time to turn our work and look at the back!
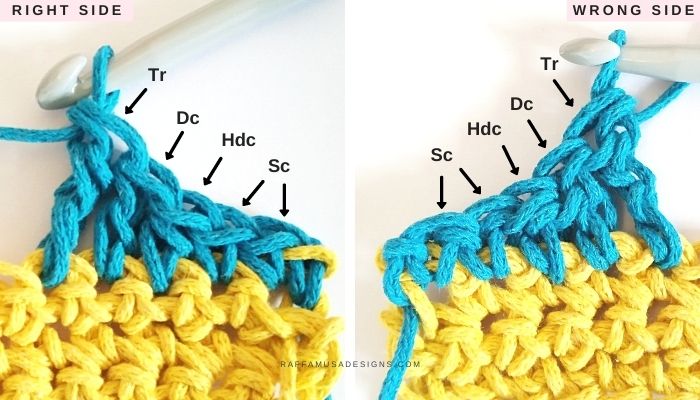
I often get the question of how to recognize the right side of a double crochet stitch. Or more panicking questions like what is the wrong side? I cannot find it…
Well, we need to make a very fundamental distinction between the right and wrong sides of a crochet stitch and the right and wrong sides of a pattern.
That might sound like a quibble but it is not. It is actually pretty important to understand the difference.
For an individual stitch, the right side is the one that is facing you while you crochet that stitch. It follows that the wrong side is the back of the stitch.
For projects crocheted in the round, the problem of the right and wrong side doesn’t even exist because you’ll crochet all the stitches in the same direction, round after round.
But what if you’re crocheting in rows? Obviously, all the stitches on the same row will have the right side facing in the same direction, i.e. you.
Now, when you turn your work, all your new stitches will have the right side in the opposite direction compared to the stitches on the previous row.
So now, what is the right side of the overall pattern?
Good question.
One Crochet Stitch vs Complex Stitch Combinations
Let’s assume that you’re working a block or square using one crochet stitch, for example only single crochet stitches or only treble stitches.
In this case, your crochet block will not have a right or wrong side! Both sides will look the same with alternating rows on the right and wrong sides.
However, for more complex stitch patterns, the designer has probably studied the stitch combination so that one side looks better than the other.
Normally, if the stitch combination includes single crochet stitches and taller ones, the right side tends to correspond with the right side of the taller stitches.
However, always read the pattern carefully, including the notes because it is usually indicated which one is the right side!
I hope that you enjoyed this chat about the anatomy of crochet stitches.
Don’t hesitate to contact me if you have any questions or comments!
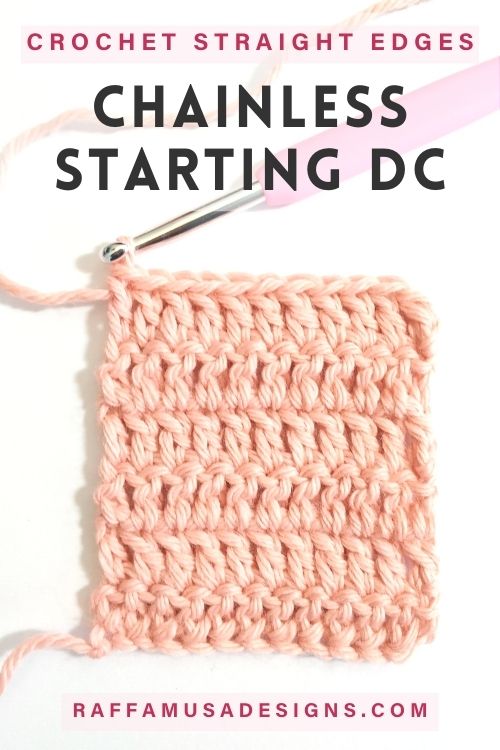
Learn more about crochet stitches with these easy tutorials…
Thank you for the brilliant clarity with which you illustrated and explained the stitches. What makes this so very helpful for me is that you identify which post goes with which top V. My brain has trouble with direction and processing space. Your clear, keyed photos are perfect. Thank you for sharing your knowledge and talent!
Hi Liz, I am so happy you found this useful! You’re comment really made my day 🙂
I have one question that I simply cannot find anywhere. I just read your tutorials and I thank you for such detail and clarity. Here is my question. For example, take a double crochet post. There is a chain leading up to the post and a chain as you move onto the next one. Which chain goes with the post, the one before or after thThe post? I Thanthink it might be a different answer for rows and in the round.
Hi,
you’re right, it’s different between rows and rounds but only apparently.
The real difference is between crocheting on the right side vs the wrong side!
When you work in the round, for example for a top-down hat, you’ll always be looking at the right side of your stitches. In that case, the top chain of a dc (and most sts actually) is the one than comes “before” the post of the st itself (that’s also why you’ll see your joining line spiraling in a top-down hat or any project worked in the round).
The moment you turn your work to crochet in rows, you’ll see that the top chain of the st comes “after” its post. But that’s just because you turned your work.
This sort of misalignment between post and top chain is one of the most confusing things, especially for new crocheters. So, I hope I didn’t confuse you.
Let me know if you have any other questions 🙂
Best,
Raffaella
Thank you so much for the clarification! For the life of me I could not figure out why the top of ch came after post it while working the next row. Lol-ing as I smack my head! 😂 Of COURSE the top of chain of stitch comes after it’s post after TURNING work.
Good grief, I feel like such a dope for not figuring out something so obvious.
You’re a terrific teacher. Thanks again for your incredibly helpful crochet lessons!
Your last explanation helped me so much. Videos don’t help like a photo with arrows. My next question is when crocheting in a round, what does “next stitch” mean, is it the same as first stitch?
Thank you!
I have been preaching about the importance of learning the anatomy of crochet stitches for years in my effort to help others up their crochet game, so I am beyond thrilled to have found your very well-written and illustrated article… THANK YOU!
I will be sharing your article with many, and I’m currently reposting it in my own blog so others can find you!
Thank you for such clarity and your illustrations. Everything is so much clearer now.
what is considered the “head ” of a crochet stitch > directions say to crochet but not around the post. Thank You
Hi, I guess that the “head” is the top two loops. Maybe the pattern uses front and back post sts and with head, they want to specify when to crochet a regular st instead.