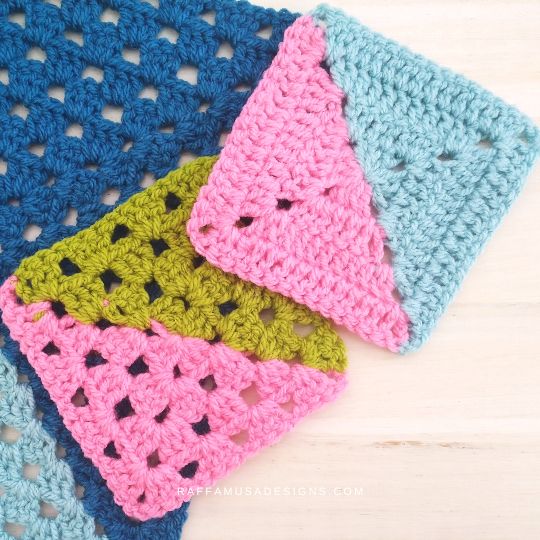
Learn how to crochet an arrow point granny square or single chevron or single ripple granny square with this step-by-step tutorial.
The arrow point granny square is a fun variation of the classic granny square and it can be a fun pattern to introduce a little variation into your granny square projects.
Crocheting this square is very easy and you can make it in any size you need for your project.
Take a look here to learn the simple rule to make this square in any size.
Find more granny square tutorials here on the blog…
Save this tutorial for later by pinning it to your best crochet board using this pin.
Note: This post contains affiliate links. If you purchase something through the links on my blog, I might earn a commission. This will not have any effect on the price you pay. For more info, please, see my Privacy Policy.
RAINBOW GRANNY BLANKET CAL
The pattern of the Arrow Point Granny Square is part of the Rainbow Granny Blanket CAL.
If you’re taking part in the CAL, make your arrow point granny square following the pattern below (HERE).
Then, see how to crochet the last round before joining HERE.

Materials
You can use any yarn with the appropriate hook. I used:
- 5.5-mm (I/9 USA, 5 UK) Hook
- Aran-Weight (4) Yarn in as many colors as you wish. I used Paintbox Yarns Simply Aran.
- Tapestry Needle
Abbreviations (US Terms)
Ch – Chain
Dc – Double Crochet
MC – Magic Circle
RS – Right Side
Sl St – Slip Stitch
Sp – Space
St – Stitch
WS – Wrong Side
Yo – Yarn over
Pattern Notes
- If the pattern says “dc 2”, you need to crochet 1 dc in each of the next 2 sts.
- (…) – Repeat the instructions within brackets for the indicated number of times.
- […] – Crochet the instructions within brackets in the same indicated st or sp.
- No specific color scheme is indicated in the pattern. Feel free to change color whenever you want.
Size
You can crochet the arrow point granny square in any size, but this pattern is for a square of about 11.25″ (28.6 cm).
How to change the size of the Arrow Point Granny Square
To make this crochet square in any size, all you need to do is vary the number of rows of your initial granny triangle. The largest side of the triangle will determine the size of each side of your square.
Then, crochet the body by adding the same number of rows as for your initial triangle. So, if you made a triangle with 7 rows, you’ll need to crochet 7 more rows for the body.
Finally, add the last two corners using the C2C Granny Stitch.
Arrow Point Granny Square Tutorial
Start by making a half granny square triangle with 7 rows (photo 1).
For the pattern of the granny triangle, take a look HERE.
At the end of row 7, you’ll have 44 dc sts, 14 ch-1 sps, and 1 ch-2 sp.
Squaring – Body
Row 8. Ch 3 (counts as a dc here and throughout), turn. Sk first ch-1 sp (indicated by the black arrow in photo 2), ([dc 3] in next ch-1 sp, ch 1)6 times (see pink arrows in photo 2), [dc 3, ch 2, dc 3] in next ch-2 sp, (ch 1, [dc 3] in next ch-1 sp) 6 times, dc 1 in last ch-1 sp (indicated by the pink arrow in photo 3). (44 dc sts, 12 ch-1 sps, 1 ch-2 sp, photo 4)
Row 9. Ch 3, turn. ([Dc 3] in next ch-1 sp, ch 1)6 times, [dc 3, ch 2, dc 3] in next ch-2 sp, (ch 1, [dc 3] in next ch-1 sp) 6 times, dc 1 in sp between last 2 dc sts (indicated by the pink arrow in photo 5). (44 dc sts, 12 ch-1 sps, 1 ch-2 sp)
Rows 10-14. Repeat row 9 (photo 6).
First Corner
Row 15a. Ch 3, turn (or if you’re changing color, join new yarn in the first dc of row 14, ch 3, turn, photo 7). ([Dc 3] in next ch-1 sp, ch 1) 5 times, [dc 3] in next ch-1 sp, dc 1 in next ch-2 sp. (20 dc sts, 5 ch-1 sps, photo 8)
Row 16a. Ch 3, turn. ([Dc 3] in next ch-1 sp, ch 1) 4 times, [dc 3] in next ch-1 sp, dc 1 in sp between last 2 dc sts. (17 dc sts, 4 ch-1 sps)
Row 17a. Ch 3, turn. ([Dc 3] in next ch-1 sp, ch 1) 3 times, [dc 3] in next ch-1 sp, dc 1 in sp between last 2 dc sts. (14 dc sts, 3 ch-1 sps)
Row 18a. Ch 3, turn. ([Dc 3] in next ch-1 sp, ch 1) 2 times, [dc 3] in next ch-1 sp, dc 1 in sp between last 2 dc sts. (11 dc sts, 2 ch-1 sps)
Row 19a. Ch 3, turn. [Dc 3] in next ch-1 sp, ch 1, [dc 3] in next ch-1 sp, dc 1 in sp between last 2 dc sts. (8 dc sts, 1 ch-1 sps)
Row 20a. Ch 3, turn. [Dc 3] in next ch-1 sp, dc 1 in sp between last 2 dc sts. (5 dc sts)
Row 21a. Ch 3, turn. Sl st in sp between last 2 dc sts. (3 chs)
Fasten off and weave in your ends (photo 9).
Second Corner
With the incomplete corner on your right (or left if you are left-handed), join yarn in the first dc of row 14.
Rows 15b-21b. Repeat rows 15a to 21a like for the first corner.
Fasten off and weave in all your ends.
Your Arrow Point Granny Square is Ready!
I hope that you enjoyed this crochet tutorial! Please, share your projects using granny squares on Facebook or Instagram using the hashtag #raffamusadesigns
Find more granny squares here on the blog…
How to Crochet a Granny Stitch Round All around your arrow Point Square
If you’re following the Rainbow Granny Blanket CAL, you’ll need to add one round all around your arrow point granny square working as for a regular granny square.
This last round will make things easier when joining your squares into a blanket, and in Rainbow CAL terms, it is what I call a “last round before joining“.
If you’re using the join-as-you-go (JAYG) method for joining your squares, use this pattern as a guide for placing your stitches.
Last round before joining
RS facing, join cream or the color that you’ll use to join your squares in the top, right ch-3 corner sp.
Round 22. Ch 4 (counts as a dc and a corner sp), [dc 3] in the same ch-3 sp. ([Dc 3], ch 1) 9 times on the top side as shown in photo 10. In the next ch-3 corner sp, [dc 3, ch 2, dc 3].
On the left side, ([dc 3], ch 1) 9 times (see photo 11). In the next ch-1 corner sp, [dc 3, ch 2, dc 3].
On the bottom side, ([dc 3], ch 1) 9 times (see photo 12). In the next ch-4 corner sp, [dc 3, ch 2, dc 3].
On the right side, ([dc 3], ch 1) 9 times (see photo 13). Working in the initial ch-3 corner sp, [dc 2] and sl st in third-made ch to join.
Fasten off and weave in your ends.
Thanks very much for sharing your pattern
I am truly enjoying your patterns! Thanks so much for the lessons. Yours is my favorite site for patterns and instructions.
Thank you 🙂