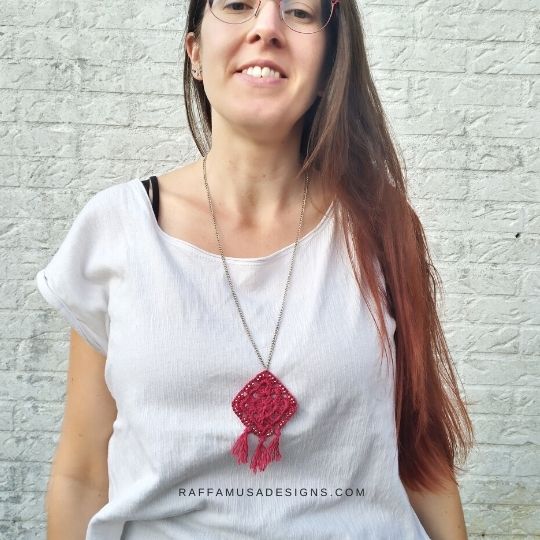
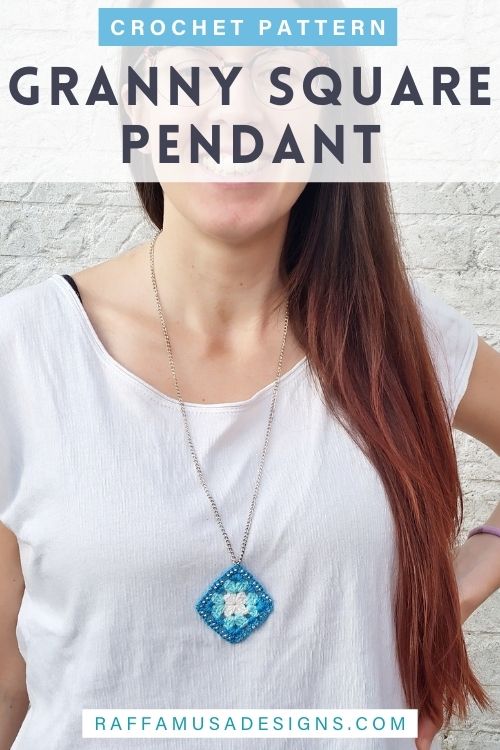
How about showing the world our love for crochet by rocking a super cool beaded granny square pendant?!
Crochet granny squares are a true classic, and in the past few years, they made the jump from a “things for grannies” to an iconic crochet motif.
Granny Square Day!
The hype around granny squares has been definitely growing in recent years, to the point that granny squares got an official Granny Square Day on August, 15th!
Every year on August 15th and the days leading to Granny Square Day, tons of granny square pictures get posted on Instagram!
If you’ve never heard of Granny Square Day, make sure to check the hashtag #grannysquareday. You’ll surely find some new granny square designs to add to your to-crochet list!
So, this year, I decided that it would be fun to celebrate Granny Square not only by posting a picture on Instagram.
Instead, here’s my idea.
Let’s celebrate together
Would it be fun to celebrate Granny Square Day together by wearing our own personalized granny square necklace?
I know that there are really endless projects to crochet with granny squares. So, why just wearing a necklace and not a huge sweater, jacket, hat, etc? Easy.
I really hope to be back home in Italy this August. Now, Italian weather in August is just not compatible with anything heavier than a swimsuit. That’s why I thought of a simple (and light!) granny square pendant to celebrate our lovely grannies!
Moreover, this pendant is super quick and easy to crochet. All you need to crochet is a classic granny square with the only addition of beads.
Pin this free tutorial and save it for later. Add the pin below to your favorite crochet board on Pinterest!
Note: this post contains affiliate links. This means that if you purchase something through the links on my blog, I might earn a commission. This will not have any effect on the price you pay. For more info, please, see my Privacy Policy.
Printable PDF Pattern
An ad-free version of this pattern is available in all my pattern shops and it contains step-by-step instructions on how to crochet a beaded double crochet stitch, and how to crochet a classic granny square in one solid color or in multiple colors.
Grab one copy on Ravelry, LoveCrafts, or Etsy!


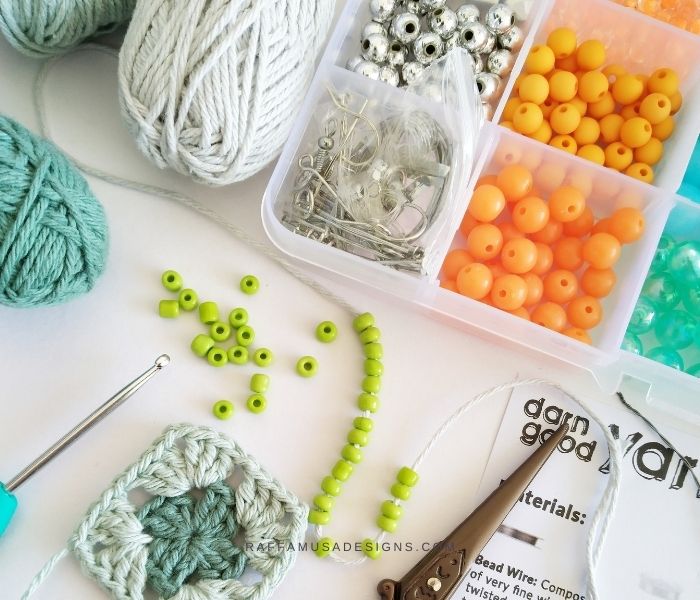
Materials
- 2.5-mm (C US, 12 UK) Crochet Hook
- Sport (2, Fine) Weight Yarn. I used Schachenmayr Catania
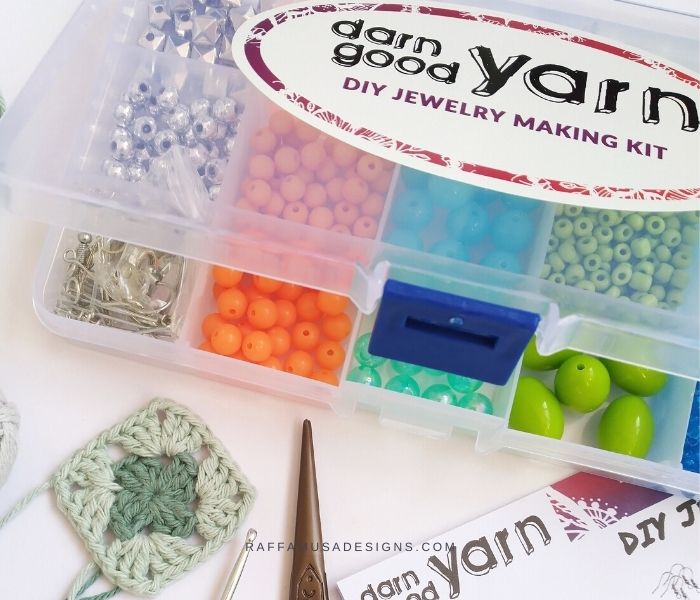
- 36 Small Beads
- Beading Needle
- One Jump Ring
What Beads to Use?
You can use any beads as long as they are not larger than one of your double crochet stitches. If your beads are larger than your stitches, they will just not fit!
For this tutorial, I am going to use the beads from the DIY Jewelry Making Kit from Darn Good Yarn, which I was so lucky to try for free. This small kit comes with lots of cute beads of different shapes. Moreover, it has some wires, earring loops, jump rings, and other useful things for making your own jewelry.
So, if you would like to support an ethical and sustainable company, make sure to check this kit from the Darn Good Yarn website!
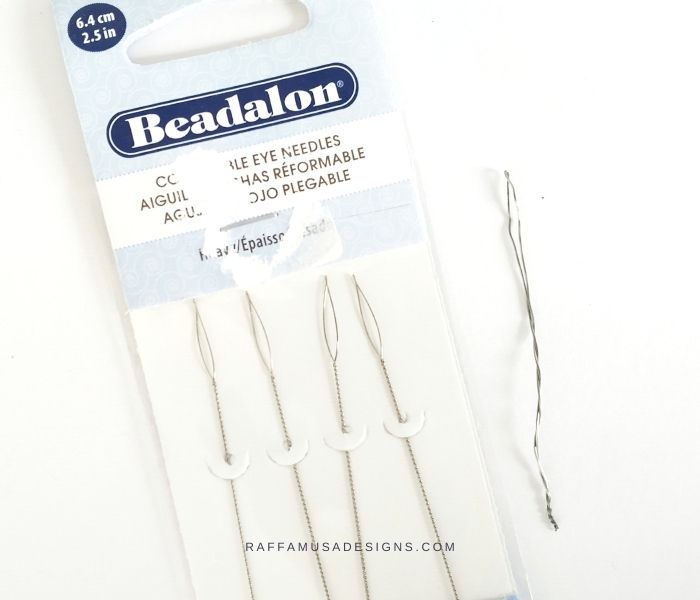
What is a Beading Needle?
A beading needle is a very thin needle, which can pass even through the smallest beads.
In order to thread the yarn, a beading needle usually has a flexible head that can be opened to accommodate the yarn, and then closed to pass through the beads.
Normally, you can purchase beading needles at most craft stores. Alternatively, you can make one yourself by bending and twisting a length of thin wire. See the needle on the right in the picture below.
If you cannot find any at your local craft store and cannot make one yourself, you can check out these beading needles on LoveCrafts.
Abbreviations (US Terms)
Ch – Chain
Dc – Double Crochet
MC – Magic Circle
Sl St – Slip Stitch
St – Stitch
Yo – Yarn over
Special Stitches
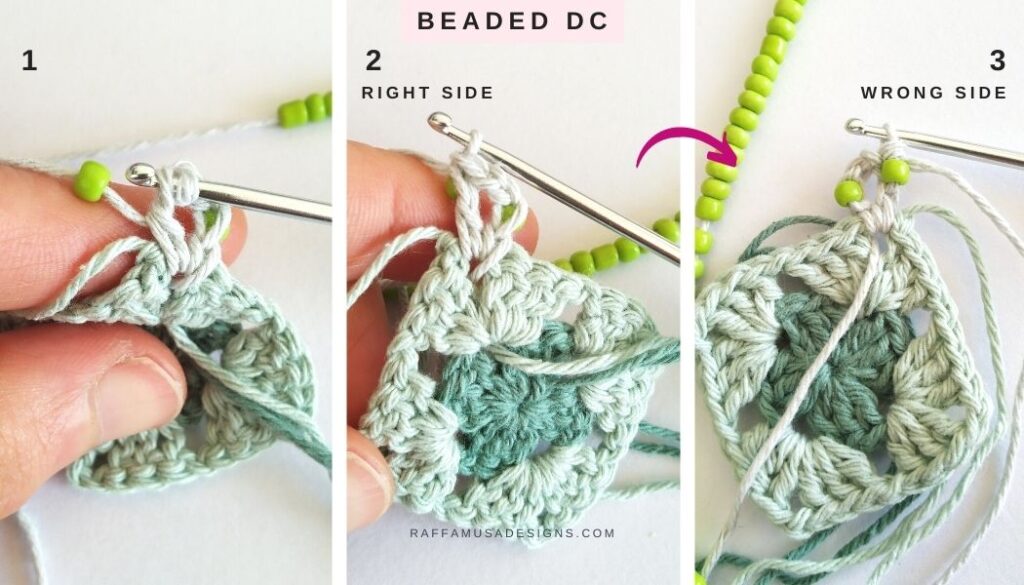
Beaded Double Crochet
Yo, insert hook into indicated st, yo, and draw up a loop. Yo and pull through 2 loops. Slide your bead close to your work. Yo and pull through the last 2 loops on the hook. Your bead will be on the wrong side of dc!
Magic Circle (MC)
Learn how to crochet a magic circle in this step-by-step tutorial.
Size
2.5″ (5 cm)
Gauge
This pattern is too small to accurately determine the gauge. Just keep in mind that the size of you pendant will vary depending on the hook and size you use.
Pattern Notes
- If the pattern says “dc 2”, it means that you have to crochet 1 dc into each of the next 2 sts.
- (…) and *… – Repeat the instructions for the indicated number of times.
- […] – Crochet the instructions within brackets into the same indicated st.
Beaded Granny Square Pendant – Free Tutorial
The first thing that you need to decide is whether you want to crochet your granny square pendant in one solid color or with different colors for the three rounds.
- One Solid Color: If you’re going to use only one color, you’ll have to bead your yarn right before starting your granny square. You won’t need the beads until round 3, so just slide the beads away from your work so that they don’t get in the way!
- Multiple Colors: When you want to change color at each round of the granny square, go ahead and crochet the first 2 rounds. Then, bead the yarn that you’re going to use for the last round.
Anyways, in cases, thread your yarn through 36 beads.
Granny Square Pattern
Note. If you’re new to granny squares, you can find a more detailed, step-by-step tutorial on how to crochet a classic granny square here!
Make a MC.
Round 1. Ch 4, (dc 3, ch 2) 3 times in MC, [dc 2], join the round with a sl st into the third initial chain.
Round 2. Sl st into the ch-1 space corner and ch 4. Dc 3 in the same corner space, ch 1, *skip the 3 dc from the previous round, [dc 3, ch 2, dc 3] all in the next ch-2 space, ch 1. Repeat from * 3 times. [Dc 2] in the initial ch-2 space and join the round with a sl st into the third-made ch.
Round 3 (add one bead to each dc of the round). Sl st into the next corner space, turn to the wrong side. Ch 2, add 1 bead to the next ch, ch 1. [Dc 3] in the same corner space. *Ch 1, dc 3 into the next ch-1 space, ch 1, [dc 3, ch 2, dc 3] into the next ch-2 corner space. Repeat from * 3 times. [Dc 2] in the initial ch-2 space and join the round with a sl st into the third-made ch.
Fasten off and weave in your ends.
Round 3 – Explained
In round 3, we will have to add one bead to each dc stitch. Again, things work differently if you are crocheting your granny square in one solid color or changing yarn at each round.
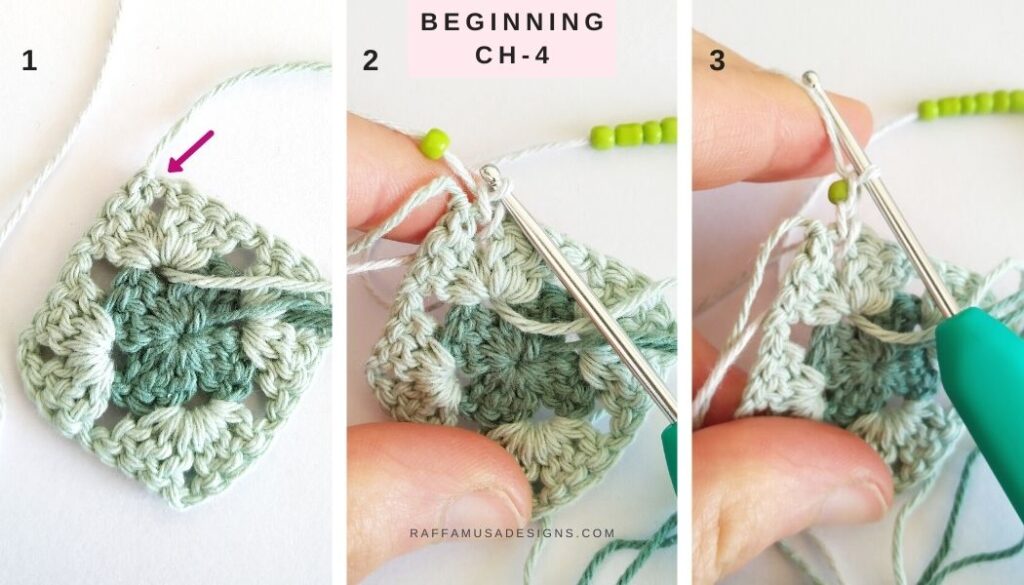
- One Solid Color: Sl st into the next ch-2, ch 4 and turn your work to the wrong side!
- Multiple Colors: Turn your granny square to the wrong side, join your yarn (with the beads already threaded!) in one of the corners, and ch 4 (photo below).
In both cases, the first ch-4 counts as a dc and a corner space. This means that you need to add your first bead to the second or third initial chain.
If you’re using pretty large beads, I’d add the bead to the second chain. On the other hand, if your beads are very small, then go for the third chain.
To add beads to your ch, simply slide one bead close to your hook. Then, yo and make a ch as normal. The bead will be “trapped” on the wrong side of the chain!
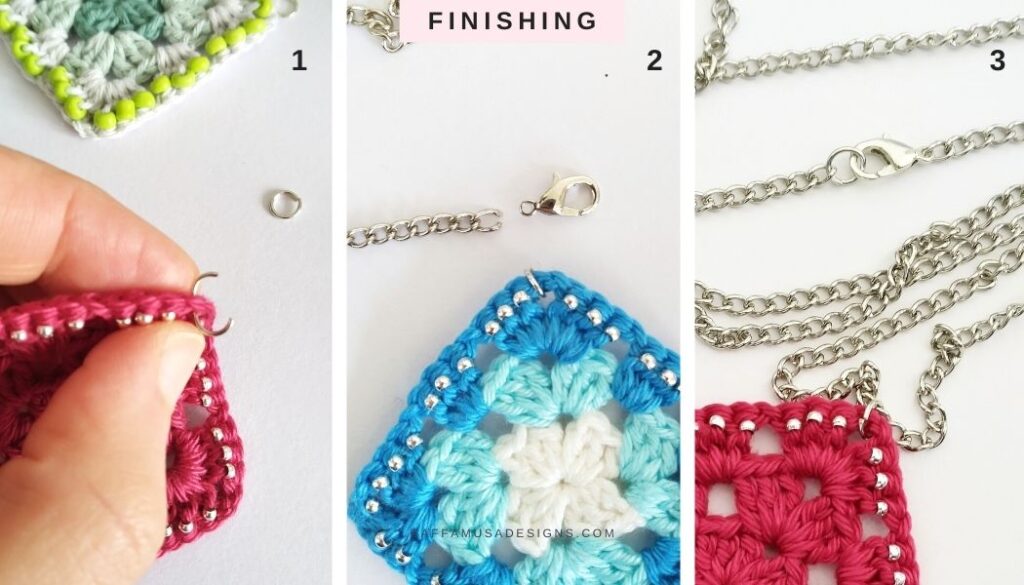
Finishing
To finish your granny square pendant, add a jump ring to one of the corners of the granny square. To do so, simply open up the jump ring and close it around the ch-2 space at the corner.
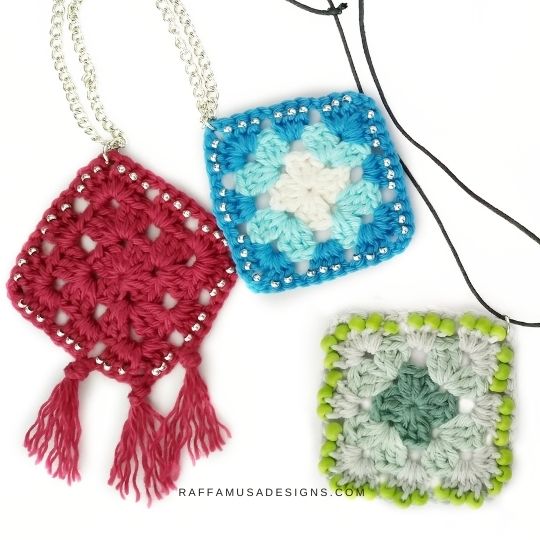
Your Beaded Granny Square Pendant is ready!
You can easily make a necklace for your pendant with a regular chain, a lobster claw, and a jump ring.
I got my chain at the local bricolage store. It is a simple, long chain, which I cut to my desired length.
To make a necklace out of a simple chain, add a lobster claw to one end of a chain. Then, pass the chain through the jump ring on your granny square, and add one more jump ring to the other end of the chain.
Alternatively, simply use a little cord.
Find more crochet jewelry patterns here on the blog!
Granny Square Day 2021 Blog Hop
The pattern of the beaded granny square pendant was featured in the Granny Square Day 2021 Blog Hop by Madame Stitch. Visit the main blog hop page HERE to find some cute patterns using granny squares!
Could you use the bead-as-you-go method instead of pre-stringing the beads for this project?
Hi Pamela, I didn’t use the bead-as-you-go method because these beads are so tiny that it’s a nightmare to thread a double strand of yarn through them. So, since there are not so many beads to pre-string, I preferred it…
Absolutely adore these! Thank you for sharing the pattern! These would also make great keychains!